Daring Fireball: Sometimes It’s Better to Just Start Over With iCloud Photo Library Syncing

Next, I wanted to delete every single photo and video from my iPhone. To my knowledge there is no easy way to do this on the iPhone itself. (There are a lot of tasks like this that are easy on the Mac thanks to Edit → Select All that are painfully tedious on iOS.) I connected the iPhone to my Mac with a Lightning cable and used Image Capture to delete all photos and videos from my phone. Image Capture just treats the iPhone like a regular camera. Image Capture crashed three times during this process (I’m still running MacOS High Sierra 10.13.6, for what it’s worth), but after the fourth run the iPhone had no photos or videos lefp.

I just deleted all the photos from a school iPad yesterday by selecting a couple and the dragging to select the rest. Worked with ~3000 photos but a bit clunky. I’ll use Image Capture in future. It’s an application I don’t remember very often.

In a 1-2-1 iPad class I do get a lot of benefit from having a mac in school. There a several things that can be solved with a quick airdrop to the mac and back. Given the iPads and mac are of similar vintage (2012).

I’ll edit a note on the mac, it syncs to the iPad (instantaneously it feels like) and I can Airdrop to class or group via classroom app. Now the Classroom app is available for the mac I need to think about upgrading the ageing mac to Mojave. I think it is new enough but spinning hard disk and skimpy ram might be a problem?

iMovie, Numbers, Keynote, Pages, and GarageBand for both Mac and iOS devices have been updated and are now listed in the App Store for free.

Apple Makes iMovie, GarageBand, and iWork Apps for Mac and iOS Free for All Users – Mac Rumors

Worth noting, although these are free already on new devices. This will help classes like mine whose iOS devices are on their second Apple ID.

Also good for distributing through MDM, which seems to be the idea.

Also Clips

I had a bit of a play with Adobe Slate this morning. It is an iOS app for publishing words and pictures.

The Devil's Pulpit
The Devil’s Pulpit

It is quite a very process which allows you to get good looking results quickly. Macworld points out some limitations that struck me immediately.

It’s dead-simple, but also quite limited. You can choose from a handful of themes to change the whole look of the story, but can’t adjust individual fonts or formats, or even add a link within a larger block of text. (You can, however, place links as standalone buttons.) You can change image formats so they appear full screen, inline, or as a scrolling “window,” but you can’t add borders or freely move images around. Video isn’t supported at all.

What we gain

I guess slate is part of the same move to allowing producers to concentrate on the content while the ‘professionals’ provide the design.
Like Medium you cannot argue with the results from a clean readable point of view.
We can publish text and pictures easily on a blog. I am sure we can find a theme or two with typography that is as good, but I suspect it might be hard to find such elegant handling of images.

What we lose

I am not a professional writer or photographer, neither am I a designer or coder (obviously;-)).
I publish ‘stuff’, sometime approaching stories, because it is fun and I want to explore the potential of these activities for learning. I have different degrees of interest in all aspects of the process, I think I can learn from each.
I’ve been thinking about the tension between ease of use and creativity for a while. For learners we will sometimes want them to concentrate on one particular aspect of the work. I can’t be the only teacher who sometimes asked pupils to leave font and style changes till the story was finished. At other times we will want them to get fully involved in messy learning.
We also lose some control of the data when we publish to silo sites. I am pretty sure that Medium and Adobe will be around a lot longer than Posterous, but I still like backups.

Alternatives

Just as I am writing this I remember an earlier experiment A Walk to Loch Oss using Odyssey.js

The odyssey.js library is being developed to help journalists, bloggers, and other people on the web publish stories that combine narratives with maps and map interactions. The library is open source and freely available to use in your projects. It is initially being built to work with most modern browsers

from: odyssey.js README on GitHub. Odyssey.js adds maps to the mix but might be an interesting alternative to Slate that allows you more control and ownership. I am sure there are others out there.

update

After I posted this I kept thinking about the ‘own your own’ argument and decided to have a wee go at replicating the story myself.
A bit of googling for CSS hints and a couple of JavaScript libraries and I have The Devil’s Pulpit 2, handcrafted.

It is nowhere near as slick as the Adobe version(surprise) and so far does not look good on mobile.

It was a lot of fun to play with but I noticed a lack of attention to the actual story in my process.

I guess the best thing about tools like slate is the way they get out of your way and let you focus on content. I just like some of the fussing and futzing that goes with more basic solutions sometimes.

I quite enjoy scripts and things that make my computing life a we bit easier. I’ve blogged a few times about AppleScript which I find very handy on my mac. On my iPhone I’ve never really found a way of automating things that stuck with me. I’ve downloaded and played with a few apps, but mostly they have felt a bit too convoluted for me.

I do regularly combine application to get a result, the so called app smashing, although I prefer the less destructive sounding playflow (I think I am the only person who does).

Workflow Icon

I’ve now found an application which looks like making this sort of thing on iOS a bit simpler: Workflow.

Workflow is more like Automator than AppleScript as it uses the same sort of block steps. You can combine any of the actions to create workflows. These steps or rather actions can deal with images, text, maps in all sorts of ways.

The think that makes this application stand out is that it has arrived hot on the heels of the iOS 8 improvements to inter application communication. You can set the application to the a Action Extension, this means it can be run from the share sheet in other applications. As you can set the input for a workflow to accept different things you can control the sheets where it will show.

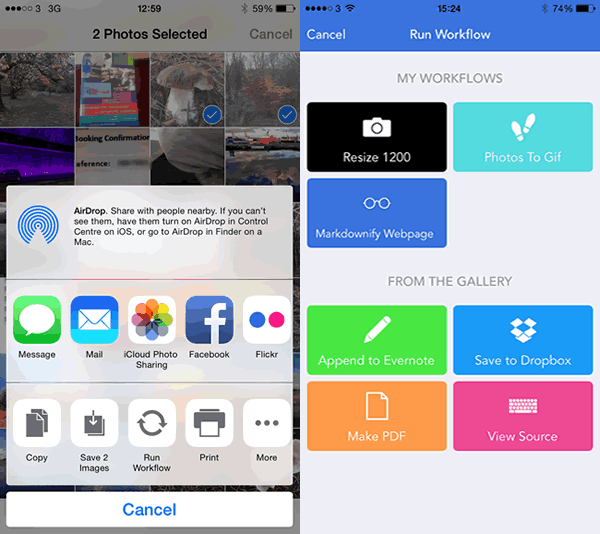
In the screenshot below I’ve selected 2 photos and then hit the share button. When I click the Run Workflow button I can choose a workflow from the next screen(shown on the right) . In this case one choice is a simple workflow I made to downsize image an save it to the camera roll.

Sharesheet

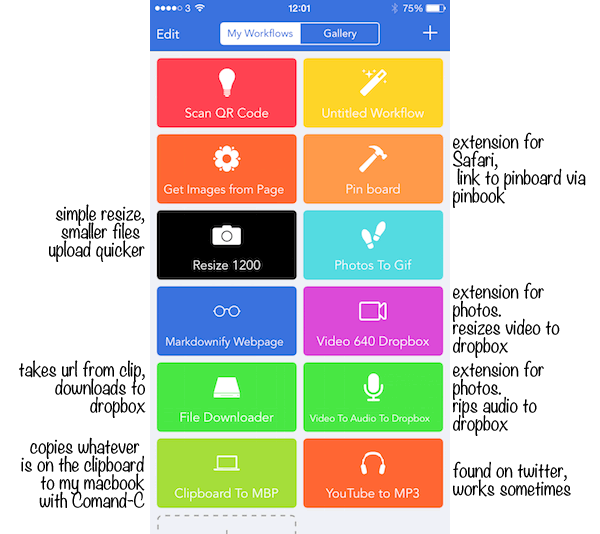
These workflows are made by dragging and dropping action blocks onto a workflow. Workflows can be set to be run from a icon added to your home screen, the Launch Center app or from share sheets in other apps. The latter can be set to accept different types of data and will then show up in the appropriate apps.

So far I’ve only made a few very simple workflows with two or three block, but there is potential to loop and have if-then type decision making.

Some Workflows

There are over 150 actions you can use to build a workflow:

Actions

I’ve only scratched the surface of workflow over the last week or so, but it looks like it could make iOS more fun and effective.

A few links:

Pulp o Mizer rtc Nuggets

TL:DR or Highlights

  • A chat with Jenni Robertson about meraki and VPP
  • John Hurst’s talk, a flavour of which is in this boo: Audioboo / An open approach to web filters
  • Ian Wilson‘s demo bossjock
  • OscarStringer: making iMovie title screens with Explain Everything
  • Joe Moretti Showbie, looks like the best thing on the iPad for handing out and gathering in work from pupils.
  • Dalry Primary School

I’ve spent the last couple of days at Dalry Primary School for the Apple Regional Training Centre Conference. I’ve been to two or three ADE events but this was my first RTC.

Apart from the obvious focus on pedagogy and learning other than tech, the main subject was the iPad, not much about macs other than as content creators, iBook Author, for the iPads.

The school itself was a pretty amazing building. The school is a ‘flagship’ building and worth looking at inside and out (pictures here).

Day One

The first day consisted of a series of half hour presentations, the stand outs, for me, were:

  • Jenni Robertson from Edinburgh talking about how they delivered courses on the other side of Scotland. Afterwards, in conversation, Jenni explained how they use Meraki and volume purchasing . some of the North Lanarkshire schools already use Meraki, but Jenni had a good model for covering a whole authority. They way Edinburgh has accessed VPP sounds as if it might be possible in other LAs too.
  • Torstan B Stauch, demoed AppShed which allows you to Build HTML5, iPhone and Android apps online for schools, education and business, and looks like it is worth following up.
  • John Hurst HT of Lever House Primary School tyalked about his schools approach to education, having taken control of their networking from the LA without Going Academy; risk assessment, outdoor fun, starting fires, getting mud between your toes and more. This was a great presentation and I managed to get a quick audioboo with John later for edutalk talking about filters:

    We hope to have John as a guest on Radio #EDUtalk next session.

  • Babar Baig and Kim Byrding talked about an app WriteReader, but their Danish approach to getting very young children to record their activities was fascinating. A combination of taking photos and have a go writing was great.
  • Ian Wilson, Mark Bunyan and Mike Watson gave a quick fire Golden Nuggets section with some great app suggestions and ideas for using them.

    Many of these are captured on twitter, and I’ve bundled a lot of the tweets I made or liked during the first day into Storify #AppleRTC Thursday 13 June 2013..

    One of the most interesting was Ian Wilson‘s demo of bossjock, I’d looked at that before but turned it down due to price. If I had a class I’d buy it in an instant now. Really good for audio storytelling with sound effects.

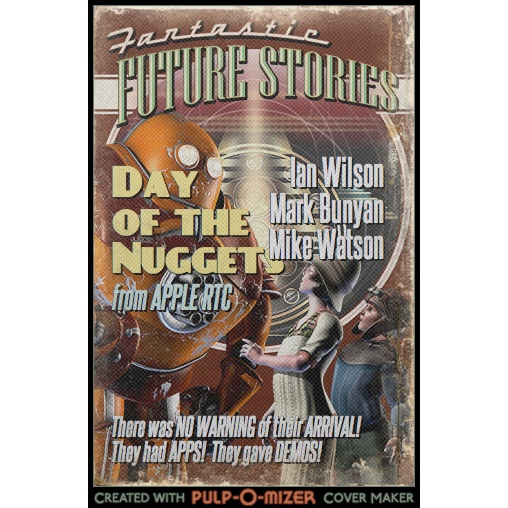
    Another goodie was sent to me from my NLC colleague Ian, PULP-O-MIZER: the custom pulp magazine cover generator with which I knocked up a quick cover(works on an ipad) in a couple of minutes and tweeted as a golden nugget.

This last activity was the only audience participation in the first day via twitter. This would be my only criticism, given that one of the themes was: Conversations, collaboration and community, a semi-formalised sharing for all participants, would I am sure, have produced some interesting stuff. But there is only some much time and almost everything we heard was of value, a good day.

Day Two

Most of day two was spent in three different workshop sessions, in order I took them:

  1. Oscar Stringer covered the workflow for Keynote to Explain Everything to iMovie and iBooks Author.

    One great tip was to use Explain Everything to create, credit or the end animations for import into iMovie, dead simple and very effective, this example took about 2 minutes to make

    Although I used iBook Author a bit last year it was nice to have a refresh of the basics and to hear the answer to our problem of importing books over Wifi to ipad: don’t make the books so big. iTunes U would seem to be the way to go, splitting the books up into chapters. The guy siting next to me in the session had a nice example of this.

    We also saw a new version of wallwisher, Padlet which works really well on the iPad for classroom collaboration.

  2. Next Dalry Primary HT Maureen Denningberg talked to the, mostly english, attendees giving an overview of Scottish Education and CfE. A few english folk now seem to be looking for a job in Scotland.

    We then were allowed to tour the school and chat to the pupils. Given the unique design of the school and the integration of technology I think the pupils are used to this. There are some interesting reviews on the school website.

  3. My final workshop of the day was with Joe Moretti. After a discussion of how to introduce iPads to staff, most of the session was dedicated to Showbie which badges itself Assignment workflow for iPad. This was the best piece of information I got in the whole show. Joe went through the basic features of the app, giving us the chance to act as pupils. We:

    1. Joined a Class
    2. Received Tasks
    3. Submitted work (from any app that can use ‘open in’ or from the camera roll, camera or via direct text or audio)
    4. Got feedback, in lots of different ways, stand out was by the teacher recording direct audio. how quick and easy it that!

    All this with the free version of Showbie which the devs have assured us will always be around and keep at least the same feature set. Although nothing lasts forever 1, showbie takes so little effort to set up for such valuable results it would be daft not to use it if you have a few ipads in class.

Joe has an iPad app Teaching With ICT which covers Essential Settings, Book Creator, Showbie, Pages, Explain Everything, Puppet Pals and iFiles. This would be a good starter selection for any classroom, based on this session would be well worth getting. I’ve certainly bought it as a thank you for the intro to Showbie.

The PirateBox

After the piratebox’s first non appearance, I was hoping that here might be an opportunity to give it a wee go. A previous ADE conference I had attended made me think the Golden Nugget session would be a bit like TeachMeet nano presentations so I packed the box. Turned out this was not so.

So on the second day I just plugged the box in and tweeted out an invitation or 3.

I must not have been inviting enough, or there was more interest official stuff going on or perhaps apple fans lack a pirate attitude? My only disappointment of the two days. I did see the lights on the box flicker a connection or two, but no one uploaded anything or left a note in the chat. I still hope that the pirate box will one day sail distributing and gathering booty. I am also wondering about using it to distribute content, say iBooks to a class without slowing the main network down.

RTC Stuff

There was also a fair bit of information on the Apple Regional Training Centres setup and it was good to clap eyes on the folk supporting the program and find out what is going on in other centres.

1.podcast producer, posterous, google reader, I am looking at you.

As i was browsing my feeds this morning I read a post on the register that was over my head, AWS’ gift to sysadmins: a cloudy command line • The Register at the end of the article I notice a link to In the Beginning was the Command Line by Neal Stephenson. I’d read this a few years ago but thought I’d like another look so followed the link only to find:

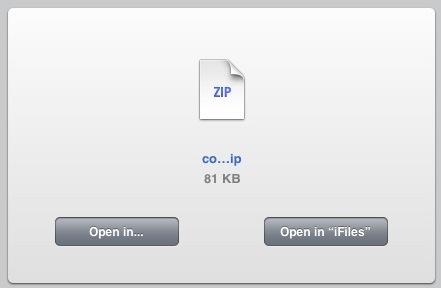
oh no a zip The article, a plain text file was zipped. I am using an iPad, I didn’t want to read it enough to move to a computer so this is what I did.

  1. copy the url
  2. switch to iCab Mobile and open the page.
  3. Click the link and download.
  4. open the download in iFiles: .1.
  5. unzip in iFiles (I like the wee unzip icon): unzip
  6. and read.

In the Beginning was the Command Line is an interesting read although it was written in 1999, an update/responce by Garrett Birke The Command Line In 2004 is good too, I guess another update in light of mobile computing would further explore Mr. Birke’s final question:

So I bought a Powerbook with OS X on it. And while an excellent solution, this is certainly not the only solution. A Windows 2000 setup on a Dell Inspiron laptop would be a fine second choice. And though there are many out there who have developed a comfortable Linux system for themselves, I believe that we should all be judged by the truest measure of the value of any personal computer: How much does it help us accomplish our tasks?

This post was written on an iPad in Texttastic, using a bookmarklet to grab links from Safari, native iOS screengrabbing, images cropped in the Photos app, resize and uploade with Pythonista. The post will be saved to dropbox when it syncs with my mac it will be posted to the blog via AppleScript. Most of this stuff helps get things done but some is just fun;)

1Well it seems that I was quite mistaken about the need for iCab. not that it is not a useful app. I switched to it when assumed that I could not open zip or sit files in Safari. I should have clicked the link:

open in ifiles safari

That would have saved a step.

A while back I joined the Mechanical Mooc with a two fold intention, one to further explore MOOCs in a practical way and two, to learn a bit of python. I am afraid I only managed to stay the course for two full weeks. This was in part due to my underestimate of the time involved. I probably spent five or six hours a week over the first two weeks and would have been better taking seven. I don’t consider the time wasted, I learnt a minuscule bit of python and had a fair number of interesting (to me) thoughts about my approach to learning and online learning in general. I also began to pay a little attention to posts about python that turned up in my browsing and reading on the web.

Recently I’ve seen a few posts about a iPad app Pythonista

Create interactive experiments and prototypes using multi-touch, animations, and sound – or just use the interactive prompt as a powerful calculator.

I read a few of these but didn’t plunk down my £2.99 until I saw this, Automating iOS: How Pythonista Changed My Workflow and The Power of Pythonista 1.2, both blog posts show how to use pythonista, on the iPad, to get things done as opposed to playing or learning. I found I learn how to do things better as part of a ‘real’ task rather than playing. This is not to say my learning is not playful. Often there will be simpler or better ways to do things but I learn something for taking a DIY approach. For example most of my recent posts tagged dropbox are about ways I’ve figured out how to do something that could be done in many other ways.

One of these Dropbox posts is about Blogging via Dropbox, which I am doing with this post. At the time I posted that I had no way to upload images. I do now thanks to macdrifter whose post has code for pythonista to take an image copied to the clipboard, resize it, upload the resized image via FTP and finally copy the URL of the uploaded image to the clipboard.

It was simple enough, even without understanding python to alter the script with my FTP details, change the size and produce jpg files rather than pngs.

drift twigs

To produce upload this image and show it I had to:

  1. Switch to the photos app
  2. Find a photo, press on it and copy.
  3. Switch to pythonista chose the script and press the run button
  4. Switch back to nebulous lite and paste in the image link.

This seems as a simple as uploading a file through the blogs web interface.

In School?

There seems to be a few schools using python in computing. I wonder if this app would be useful. Some of the examples involve games or graphics, which I found off-putting and difficult, these may be just the thing to engage pupils (who possible have less interest in resizing and uploading graphics).

Recently I was discussing the various mobile projects running in Scotland with a friend, they mentioned that they though that iPad projects relied too much on Apps that make things to easy for the learner, iMovie trailers being one example, and compare this to a ‘richer’ learning environment provided by scratch. There is a whole other discussion waiting there but I see several interesting and powerful ways of coding developing on the iPad, Pythonista being one. Codea – iPad and ScriptKit – Drag and Drop Programming for iPad. another two. These two use The Programming Language Lua.
ScripKit looks interesting because:

ScriptKit is a touchable programming environment for building simple mobile prototypes on iPad using native iOS UI components and social media APIs, available via an intuitive drag and drop interface.

The social media APIs is exciting cause it means access to Dropbox, Facebook and Instagram. ScriptKit comes with some nice example but needs an in app purchase at £7.99 to edit the scripts. I am not ready to use it so have not bought it yet.
And Codea

Codea for iPad lets you create games and simulations — or just about any visual idea you have. Turn your thoughts into interactive creations that make use of iPad features like Multi-Touch and the accelerometer.

Back to Pythonista

For me it is early days I just bought the app yesterday, I already appreciate its design and have had hints of its power. It might just keep my python learning curve moving ever so gently upwards.
It is also becoming more apparent that iPads are not only good for creation as well as consumption they are good for tinkering too. As someone who like tinkering this is a positive turn compared to the idea that Apple, and others, are making tools that are increasingly locked down.

I am pretty keen on posting photos to the Internet, not because I have great interest (or any skill) in photography but as an alternative, to blogging, way of recording events. I’ve been using flickr since 2004 and am currently enjoying instagram (mine via api) and posterous

Mostly I take photos with my phone (the best camera). Recently I’ve been testing the ways apple gives you to post photos from an iOS device.

Public Photo Stream

I’ve become a fan of photo stream,

When you take photos on an iOS device or import photos from your digital camera to your computer, Photo Stream will automatically upload it so it is available on all your devices.

You can also publish photos to a public photo stream.

Here is a guide to making a public photo stream. Click to see a bigger version:

How to Photo Stream 500

And here is the photo stream:
Ben Challum – Photo Stream. These are simple and quick to create and easy to share.

iPhoto Journals

For these you ned to buy iPhoto. There are a wee bit more complex and interesting as you can include a variety of different elements, including, map, weather, notes and the like.
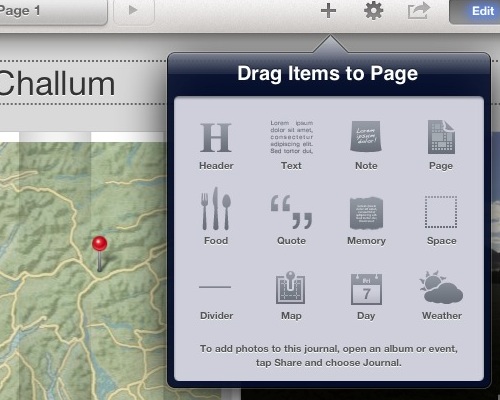
Journal Elements

Again they are pretty straightforward to create and upload. Here are much the same photos as a journal: Ben Challum.

Here is the gallery, created on an iPad viewed in iPhoto on a iPhone
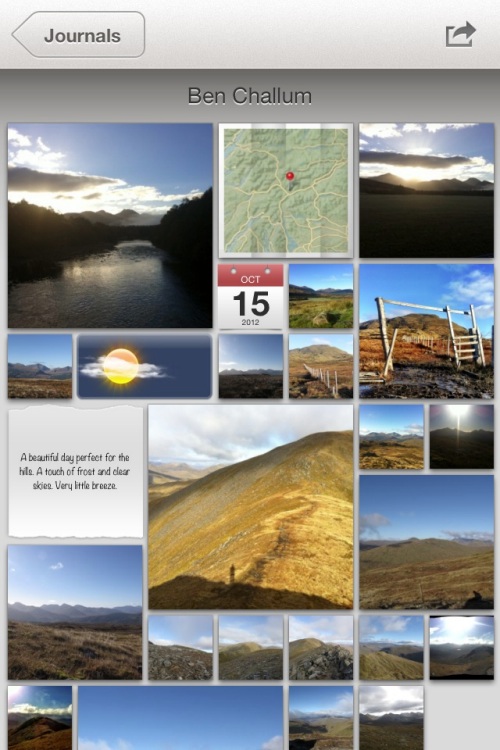
Journal iPhone

Photo Stream vs Journal

On thing I noticed with photo stream was that you could post a link, before the photos are uploaded. With iPhoto journals you have uploaded the whole journal before you can share the link. You can share a photo stream privately, although I don’t think I would. Both produce online sites with pretty horrible urls (eg: https://www.icloud.com/journal/#2;CAEQARoQpdbIWlofBmKRAh_cPbtctA;09537452-2A80-49C7-A86F-71E8734846CF!).

Photo stream is quicker, with less choice, with a journal you can edit the layout of photos easily (especially easy on an iPad). Journals have more features for telling a story by adding non photographic information. The photo stream seem to be designed to share photos as you go.

Educational Use

I could see the photo stream being used by a class or group to share photos and images with each other as they go allowing them to work on or use images created on classmates devices as they are created. It is simple to add images to a shared photo stream over a period.

Shared Photo Streams don’t count against your iCloud storage, and they work over Wi-Fi and cellular networks.

Apple – iCloud – photo stream. Realistically I doubt there are many cellular devices in our classrooms.

Journals are more suit to creating artefacts, perhaps using photos gather via photo stream. Journals allow the addition of text, editing of layout and look like an interesting way to tell a story, record some learning and share it, a fairly easy way to create a image heavy, attractive mini Web site.

Thus far and no further

Apart from the lengthy and un-rememberable urls the other thing I don’t like is the locked in aspect of the sharing. There is on api or RSS feed that could be used take the images and reposition them, but I suppose that is what flickr is for.

Flickr Export from iPhoto

This is pretty good, it is easy from iPhoto on iOS to send images to flickr, create sets and tagging photos as they go, here are the same pictures on Flickr: Ben Challum – a set on Flickr and flickr makes it easy to repurpose the images:


above updated 18 Oct 2022, the object/flash embed code replaced by the url to the set!

Although both photo stream and journals provide slideshow views there is no way, as far as I can see, to show these elsewhere.

Finally

I still like to play with putting photos on a map: A Mapped Walk and a have a reasonable workflow that let me put that together in about 20 minutes. I also like messing with panos so here is one from the same walk:
Ben Challum Pano.

David Baugh points to Pinnacle studio iPad video editor.

I was delighted to find a more feature rich video editor for free in Pinnacle Studio and even better – for now it is free.

from: Learning in Touch » Blog Archive » Free Video Editing iPad App from Pinnacle Studio with multi layer video David has a great Digital Storytelling page too.


I’ve mostly though about MOOCs as cpd , but…

So, what does this have to do with K-12? Everything. Or at least a lot. If this is the wave or a wave of the future of learning and teaching then this is something that we need to pay attention to. If the job of parents, K-12 educators and the public school system is to prepare students for the environments they will be expected to work and learn in, then we ought to pay very close attention.

from: What is a MOOC? The Canadian Connection.


This and the others in the Honest Logos set made me laugh, but perhaps an interesting take on the design a logo activity?

Mcdiabetes

image Creative Commons — Attribution-NonCommercial 3.0 Unported — CC BY-NC 3.0
from: Honest logos on the Behance Network

Haiku Deck is

the simple new way to create stunning presentations – whether you are pitching an idea, teaching a lesson, telling a story, or igniting a movement, it’s fast, fun and simple for anyone to use.

Says Haiku Deck. It is an iPad application for making presentations. Very simple to use and the defaults look nice.

That took about three minutes to knock up. The main feature, based on three minutes use, seem to be a nice search to find images to match your words. Looks like it searches Flickr and some other sources. It does some sort of cc search. I don’t think it quite respects the license though. This image:

Winner

By David Muir is licensed under a Creative Commons — Attribution-NonCommercial-NoDerivs 2.0 Generic — CC BY-NC-ND 2.0 license. Unfortunately the app does not seem to do the attribution for you.

Haiku deck says:

Where do Haiku Deck images come from?
Haiku Deck finds images from across the Internet that photographers have licensed under the Creative Commons license. Some Creative Commons images carry a “not for commercial use” restriction. If you’re making a Haiku Deck for commercial use, please be sure to turn the “commercial use only” filter.

I am not sure that is in the spirit of the attribution part of the license?

It does however make a very presentable presentation pretty quickly, saving to the web, announcing by twitter and providing an embed code. It also exports to PDF via mail.

The price is right, free with some paid for themes, the app is extremely easy to use and if they added attribution to the images it would be even better.

Update, my bad: I had adjusted the embed code to fit the iframe into my blog the attribution appears on the Haiku Deck website: Radio #EDUtalk – A Haiku Deck from Giant Thinkwell and on the embed if you don’t mess about with the code to resize the iFrame. Apologies to Giant Thinkwell.

So here is the attribution copied from the Radio #EDUtalk – A Haiku Deck from Giant Thinkwell page:

Much to my embarrassment I asked about this on twitter: Twitter / kleneway: @johnjohnston @HaikuDeck you …

Update 2: I’e also noticed a nice feature, republish a slideshow with an extra slide updates the original and the embed.

Blogged with a hand knitted system