Iosicons

The other day a colleague and I were trying to remember how to get the icon art for iOS apps to help write notes. We though we remembered a way to get them out from examining the package. Later I was reading the ADE list, where there was a bit of bemoaning that you can no longer copy the art from iTunes. Someone mentioned that the art was now is a file iTunesArtwork inside the .ipa files in the iTunes folder, the .ipa file being zip files.

Icon Extraction Manual

This means you can get the art work by, changing the extension on an ios app file to .zip, expanding the archive, adding a .png extension to the iTunesArtwork file. You end up with the artwork png file.

Automating

This seems like a fairly long road for a short cut. A wee bit of though lead me to try a few shell scripts. Basically you can use the unzip command to extract the iTunesArtwork file with a png extension and you get a png file of the artwork.

To make this a little easier I wrapped up the shell script in an AppleScript. Drag a bunch of .ipa files onto the droplet and it will create a folder on your desktop and extract the art work as png files. Double click the droplet and it will prompt you for a file and do the same. The files are named the same as the .ipa files except I replace all non alphanumerical characters with an underscore. I’ve put the script in my dropbox in case anyone would find it useful, and uploaded the text so you can View the Script.

BTW: Rounded Corners

So the artwork extracted does not have the rounded corners:

I Movie 140.ipa

You can change the way that looks on the web with a bit of css:
I Movie 140.ipa

style="-moz-border-radius: 20%;-webkit-border-radius: 20%;border-radius: 20%;"

This might help other folk documenting iOS stuff. I’ve now got a folder of >600 icons ready to go.


Eslabones / Links — [EXPLORE] by Juan R. Martos
Attribution-NonCommercial-NoDerivs License

Recent spotted mostly from google reader:

As i was browsing my feeds this morning I read a post on the register that was over my head, AWS’ gift to sysadmins: a cloudy command line • The Register at the end of the article I notice a link to In the Beginning was the Command Line by Neal Stephenson. I’d read this a few years ago but thought I’d like another look so followed the link only to find:

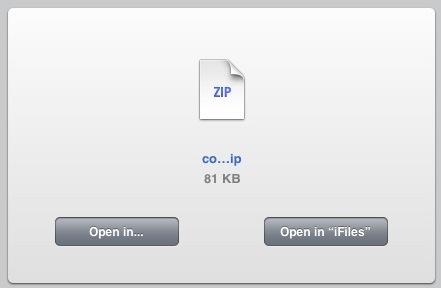
oh no a zip The article, a plain text file was zipped. I am using an iPad, I didn’t want to read it enough to move to a computer so this is what I did.

  1. copy the url
  2. switch to iCab Mobile and open the page.
  3. Click the link and download.
  4. open the download in iFiles: .1.
  5. unzip in iFiles (I like the wee unzip icon): unzip
  6. and read.

In the Beginning was the Command Line is an interesting read although it was written in 1999, an update/responce by Garrett Birke The Command Line In 2004 is good too, I guess another update in light of mobile computing would further explore Mr. Birke’s final question:

So I bought a Powerbook with OS X on it. And while an excellent solution, this is certainly not the only solution. A Windows 2000 setup on a Dell Inspiron laptop would be a fine second choice. And though there are many out there who have developed a comfortable Linux system for themselves, I believe that we should all be judged by the truest measure of the value of any personal computer: How much does it help us accomplish our tasks?

This post was written on an iPad in Texttastic, using a bookmarklet to grab links from Safari, native iOS screengrabbing, images cropped in the Photos app, resize and uploade with Pythonista. The post will be saved to dropbox when it syncs with my mac it will be posted to the blog via AppleScript. Most of this stuff helps get things done but some is just fun;)

1Well it seems that I was quite mistaken about the need for iCab. not that it is not a useful app. I switched to it when assumed that I could not open zip or sit files in Safari. I should have clicked the link:

open in ifiles safari

That would have saved a step.

A while back I joined the Mechanical Mooc with a two fold intention, one to further explore MOOCs in a practical way and two, to learn a bit of python. I am afraid I only managed to stay the course for two full weeks. This was in part due to my underestimate of the time involved. I probably spent five or six hours a week over the first two weeks and would have been better taking seven. I don’t consider the time wasted, I learnt a minuscule bit of python and had a fair number of interesting (to me) thoughts about my approach to learning and online learning in general. I also began to pay a little attention to posts about python that turned up in my browsing and reading on the web.

Recently I’ve seen a few posts about a iPad app Pythonista

Create interactive experiments and prototypes using multi-touch, animations, and sound – or just use the interactive prompt as a powerful calculator.

I read a few of these but didn’t plunk down my £2.99 until I saw this, Automating iOS: How Pythonista Changed My Workflow and The Power of Pythonista 1.2, both blog posts show how to use pythonista, on the iPad, to get things done as opposed to playing or learning. I found I learn how to do things better as part of a ‘real’ task rather than playing. This is not to say my learning is not playful. Often there will be simpler or better ways to do things but I learn something for taking a DIY approach. For example most of my recent posts tagged dropbox are about ways I’ve figured out how to do something that could be done in many other ways.

One of these Dropbox posts is about Blogging via Dropbox, which I am doing with this post. At the time I posted that I had no way to upload images. I do now thanks to macdrifter whose post has code for pythonista to take an image copied to the clipboard, resize it, upload the resized image via FTP and finally copy the URL of the uploaded image to the clipboard.

It was simple enough, even without understanding python to alter the script with my FTP details, change the size and produce jpg files rather than pngs.

drift twigs

To produce upload this image and show it I had to:

  1. Switch to the photos app
  2. Find a photo, press on it and copy.
  3. Switch to pythonista chose the script and press the run button
  4. Switch back to nebulous lite and paste in the image link.

This seems as a simple as uploading a file through the blogs web interface.

In School?

There seems to be a few schools using python in computing. I wonder if this app would be useful. Some of the examples involve games or graphics, which I found off-putting and difficult, these may be just the thing to engage pupils (who possible have less interest in resizing and uploading graphics).

Recently I was discussing the various mobile projects running in Scotland with a friend, they mentioned that they though that iPad projects relied too much on Apps that make things to easy for the learner, iMovie trailers being one example, and compare this to a ‘richer’ learning environment provided by scratch. There is a whole other discussion waiting there but I see several interesting and powerful ways of coding developing on the iPad, Pythonista being one. Codea – iPad and ScriptKit – Drag and Drop Programming for iPad. another two. These two use The Programming Language Lua.
ScripKit looks interesting because:

ScriptKit is a touchable programming environment for building simple mobile prototypes on iPad using native iOS UI components and social media APIs, available via an intuitive drag and drop interface.

The social media APIs is exciting cause it means access to Dropbox, Facebook and Instagram. ScriptKit comes with some nice example but needs an in app purchase at £7.99 to edit the scripts. I am not ready to use it so have not bought it yet.
And Codea

Codea for iPad lets you create games and simulations — or just about any visual idea you have. Turn your thoughts into interactive creations that make use of iPad features like Multi-Touch and the accelerometer.

Back to Pythonista

For me it is early days I just bought the app yesterday, I already appreciate its design and have had hints of its power. It might just keep my python learning curve moving ever so gently upwards.
It is also becoming more apparent that iPads are not only good for creation as well as consumption they are good for tinkering too. As someone who like tinkering this is a positive turn compared to the idea that Apple, and others, are making tools that are increasingly locked down.

I am pretty keen on posting photos to the Internet, not because I have great interest (or any skill) in photography but as an alternative, to blogging, way of recording events. I’ve been using flickr since 2004 and am currently enjoying instagram (mine via api) and posterous

Mostly I take photos with my phone (the best camera). Recently I’ve been testing the ways apple gives you to post photos from an iOS device.

Public Photo Stream

I’ve become a fan of photo stream,

When you take photos on an iOS device or import photos from your digital camera to your computer, Photo Stream will automatically upload it so it is available on all your devices.

You can also publish photos to a public photo stream.

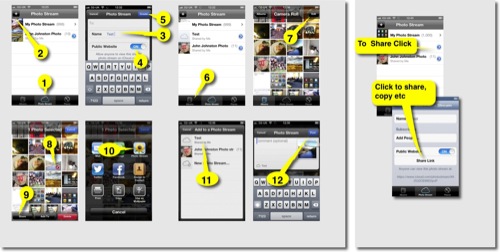
Here is a guide to making a public photo stream. Click to see a bigger version:

How to Photo Stream 500

And here is the photo stream:
Ben Challum – Photo Stream. These are simple and quick to create and easy to share.

iPhoto Journals

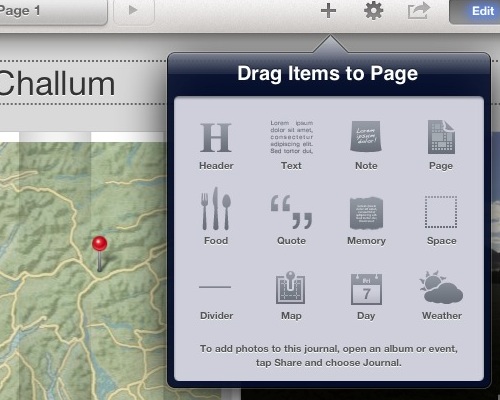
For these you ned to buy iPhoto. There are a wee bit more complex and interesting as you can include a variety of different elements, including, map, weather, notes and the like.

Journal Elements

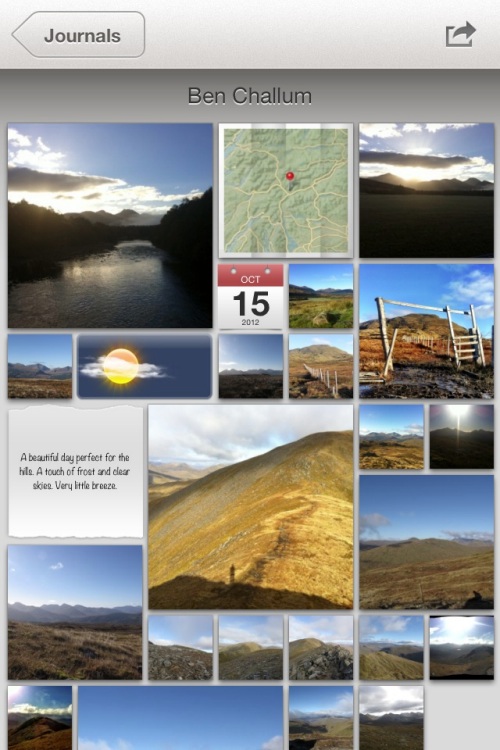
Again they are pretty straightforward to create and upload. Here are much the same photos as a journal: Ben Challum.

Here is the gallery, created on an iPad viewed in iPhoto on a iPhone

Journal iPhone

Photo Stream vs Journal

On thing I noticed with photo stream was that you could post a link, before the photos are uploaded. With iPhoto journals you have uploaded the whole journal before you can share the link. You can share a photo stream privately, although I don’t think I would. Both produce online sites with pretty horrible urls (eg: https://www.icloud.com/journal/#2;CAEQARoQpdbIWlofBmKRAh_cPbtctA;09537452-2A80-49C7-A86F-71E8734846CF!).

Photo stream is quicker, with less choice, with a journal you can edit the layout of photos easily (especially easy on an iPad). Journals have more features for telling a story by adding non photographic information. The photo stream seem to be designed to share photos as you go.

Educational Use

I could see the photo stream being used by a class or group to share photos and images with each other as they go allowing them to work on or use images created on classmates devices as they are created. It is simple to add images to a shared photo stream over a period.

Shared Photo Streams don’t count against your iCloud storage, and they work over Wi-Fi and cellular networks.

Apple – iCloud – photo stream. Realistically I doubt there are many cellular devices in our classrooms.

Journals are more suit to creating artefacts, perhaps using photos gather via photo stream. Journals allow the addition of text, editing of layout and look like an interesting way to tell a story, record some learning and share it, a fairly easy way to create a image heavy, attractive mini Web site.

Thus far and no further

Apart from the lengthy and un-rememberable urls the other thing I don’t like is the locked in aspect of the sharing. There is on api or RSS feed that could be used take the images and reposition them, but I suppose that is what flickr is for.

Flickr Export from iPhoto

This is pretty good, it is easy from iPhoto on iOS to send images to flickr, create sets and tagging photos as they go, here are the same pictures on Flickr: Ben Challum – a set on Flickr and flickr makes it easy to repurpose the images:


above updated 18 Oct 2022, the object/flash embed code replaced by the url to the set!

Although both photo stream and journals provide slideshow views there is no way, as far as I can see, to show these elsewhere.

Finally

I still like to play with putting photos on a map: A Mapped Walk and a have a reasonable workflow that let me put that together in about 20 minutes. I also like messing with panos so here is one from the same walk:
Ben Challum Pano.

David Baugh points to Pinnacle studio iPad video editor.

I was delighted to find a more feature rich video editor for free in Pinnacle Studio and even better – for now it is free.

from: Learning in Touch » Blog Archive » Free Video Editing iPad App from Pinnacle Studio with multi layer video David has a great Digital Storytelling page too.


I’ve mostly though about MOOCs as cpd , but…

So, what does this have to do with K-12? Everything. Or at least a lot. If this is the wave or a wave of the future of learning and teaching then this is something that we need to pay attention to. If the job of parents, K-12 educators and the public school system is to prepare students for the environments they will be expected to work and learn in, then we ought to pay very close attention.

from: What is a MOOC? The Canadian Connection.


This and the others in the Honest Logos set made me laugh, but perhaps an interesting take on the design a logo activity?

Mcdiabetes

image Creative Commons — Attribution-NonCommercial 3.0 Unported — CC BY-NC 3.0
from: Honest logos on the Behance Network

Haiku Deck is

the simple new way to create stunning presentations – whether you are pitching an idea, teaching a lesson, telling a story, or igniting a movement, it’s fast, fun and simple for anyone to use.

Says Haiku Deck. It is an iPad application for making presentations. Very simple to use and the defaults look nice.

That took about three minutes to knock up. The main feature, based on three minutes use, seem to be a nice search to find images to match your words. Looks like it searches Flickr and some other sources. It does some sort of cc search. I don’t think it quite respects the license though. This image:

Winner

By David Muir is licensed under a Creative Commons — Attribution-NonCommercial-NoDerivs 2.0 Generic — CC BY-NC-ND 2.0 license. Unfortunately the app does not seem to do the attribution for you.

Haiku deck says:

Where do Haiku Deck images come from?
Haiku Deck finds images from across the Internet that photographers have licensed under the Creative Commons license. Some Creative Commons images carry a “not for commercial use” restriction. If you’re making a Haiku Deck for commercial use, please be sure to turn the “commercial use only” filter.

I am not sure that is in the spirit of the attribution part of the license?

It does however make a very presentable presentation pretty quickly, saving to the web, announcing by twitter and providing an embed code. It also exports to PDF via mail.

The price is right, free with some paid for themes, the app is extremely easy to use and if they added attribution to the images it would be even better.

Update, my bad: I had adjusted the embed code to fit the iframe into my blog the attribution appears on the Haiku Deck website: Radio #EDUtalk – A Haiku Deck from Giant Thinkwell and on the embed if you don’t mess about with the code to resize the iFrame. Apologies to Giant Thinkwell.

So here is the attribution copied from the Radio #EDUtalk – A Haiku Deck from Giant Thinkwell page:

Much to my embarrassment I asked about this on twitter: Twitter / kleneway: @johnjohnston @HaikuDeck you …

Update 2: I’e also noticed a nice feature, republish a slideshow with an extra slide updates the original and the embed.

Blogged with a hand knitted system

Blogging Au Plein Air,  after Jean-Baptiste-Camille Corot by Mike Licht, NotionsCapital.com
Attribution License

Glew is becoming more interesting everyday. The MetaWeblogAPI is now working. This is a big deal. The MetaWebLogAPI is the code that allows you to post to a blog through a variety of software rather than through the web interface. I am writing this post on my iPad using the blogpress app. This will publish this post via the MetaWeblogAPI. I usually use textmate on my mac to write blog posts. It uses the MetaWeblogAPI too. 
Recently I’ve been asking primary pupils about how many of them own an iPod touch, often in the upper primary class it is the majority of the class.
Glow blogs never managed to have this feature enabled. A great pity. The potential for pupils blogging on the hoof is a great one. Imagine a school trip. The teacher has an iPhone, this is set to be a hotspot. Pupils are posting pictures and text while they are on the trip. iPod equipped pupils could be updating their eportfolios by grabbing photos of their artwork as it is produced. Glew blogs can now also be public on the Internet, so you can see my first Mobile test made with BlogPress on my iPhone and a Blogsy test made from an iPad.  – Posted using BlogPress from my iPad


I want to help empower our learning community to design, hack, build, collaborate, remix, share and explore in all sorts of ways. In essence, I strive to contribute toward building a learning community that is open-source, accessible and inspired by principles of DIY. Is the iPad the best platform for cultivating such an ideal?

from: The Digital Down Low: Some critical questions about iPads and 1-1 learning

Along with some other interesting other ones questioning the idea that ipad 1-2-1 is a good idea.

I do not think that we, in the UK, are yet in a position where there is an overwhelming belief in the iPads as a good thing in the classroom.

I do think that iPads are a good tool for some aspects of collaboration, remixing, sharing and exploring. They are, in my opinion, excellent digital story telling devices.

I wonder how many school with more open devices are doing much in the way of DIY hacking and building. There is a lot of online discussion: eduHacking · linkli.st but I don’t think much penetration into mainstream has happened yet.

I do believe that we are seeing some extraordinary effects in iPad 1-2-1s. Some of this my be the novelty effect, but there seems to be something special by having ubiquitous instant on, easy to access computer power in everyones hands.

It may be that the collaborative and creative environment that 1-2-1 ipad use seems to foster will grow into a desire for the complex making that Matt Montagne wishes to foster. This may lead to interesting apps or a demand for more open devices.

I’ve been aware of Radiowaves for a long time, it was one of the inspirations for Radio Sandaig and started me podcasting. I have not followed the development of the site with a great deal of attention but have been aware that it has been evolving in interesting ways. This is what they say about themselves:

Radiowaves is the social learning environment that provides social media for education. It enables schools to create and safely share videos, podcasts and blogs. With a free Radiowaves website you can easily start school blogging, join national campaigns and develop digital literacy skills.

Over 50,000 pupils use Radiowaves regularly to broadcast their school podcasts and videos to friends and family via the safe social network.

I’ve also met Mark Riches CEO at Radiowaves (and founding director of NUMU which looks interesting too) a few times over the years and he talked about RadioWaves on EDUtalk at BETT. At that point he told me that they were working on an iOS app and I asked him to let me know when it came out. On Friday he did. I am really impressed with this free app.

I’ve not really got my head round the Radiowaves site, its features and how teacher and pupils sites work together, but I love the app and though it worth posting some information about it.

You can get a free account at Radiowaves, this allows unlimited blogging for a school but you are limited to 30 minutes of audio and video. I created a free account to test this app. I didn’t read any of the help or explanations either in the app or online, just clicked around.

Makewaves
Makewaves 1

The app is called Makewaves (iTunes link) and is free. It runs on an iPhone, iPod touch or iPad. On the ipad it runs as an iphone sized app but can be used at 2x size to fill the screen.

I really like the look and feel of this application. Simple and straightforward.A lot of recent apps that I’ve downloaded seem to be simpler and cleaner looking, less 3d drop shadows and gradients, more space and less colour.

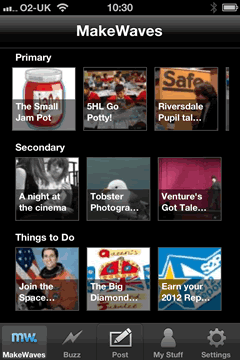
The app is split into 5 main sections accessed through the toolbar along the bottom:MakeWaves, Buzz, Post, My Stuff and Settings.

The MakeWaves screens shows three streams of posts from the site, primary, secondary and Things to Do. Clicking on thumbnails lets you access the content on the app.

The section I was really interested in was the Post one, but before I went there I need to visit the Settings and add my account details, this was straightforward although I didn’t notice the setting for default item which was story rather than blog. I am still not too sure of the difference between the two.
Makewaves 2

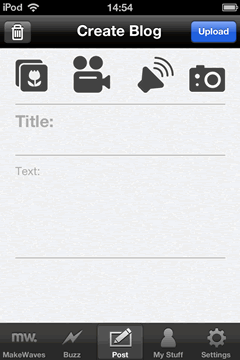
As soon as I saw the Post screen I liked it. 4 simple buttons at the top to upload media, Pictures from the camera roll, video, audio and the camera. The video button lets you choose from the camera roll or take a new video.

In seconds I had taken screenshot, used the Photo button to choose it, written a line of text and posted it.

I followed by testing the audio button, the app lets you record a sound and upload it, again a very straightforward process.

I then tested Video, and used an iPad and iPod Touch as well. All preformed beautifully.

Later on I used 3g to post a short audio file from outside. It worked a treat, uploading quickly.

An interesting feature of the app and radiowaves generally is the teacher approval. I was acting, I think, as both teacher and pupil so had to approve my own posts. The process is pretty simple on the radiowaves site and there is a in app purchase (£1.49) that lets you approve your pupils on the Buzz screen.

The My Stuff screen gives you a view of your stories and blogs, lets yuo know the ones that are still awaiting approval and the work of others in your station. You can also see if anyone liked your work.

The setting screen is straightforward, the place you can log in, easy too to log out and allow the same device to be used by more than one pupil.

I am extremely impressed with this app. It is the first one I have seen that allows posting of images, video and sound. (When I saw the posterous app I immediately put in a feature request for audio recording).

The application, when used on an iphone or ipod touch, is not built for long form blogging, but it is ideal for the much more interesting, in my opinion, mobile and group publishing of rich media. This is done in a way that minimises the technical barriers allowing users to concentrate on digital storytelling.

This could be an amazing tool for trip blogging. It should even be possible to have, say, several ipod touch out on a trip using one iphone’s tethering to allow mobile blogging by a group.

Finally having struggled and mostly failed to find a simple mobile blogging method for glow blogs it would be great to have a similar app in he new glow.