The music lives on – Apple

iPod touch will be available while supplies last

I feel quite sad about this. I don’t think the iPod every got the traction it deserved in the classroom.

Back in the late 2000s I had a click wheel iPod in my class. It was a great device for recording audio on the move. Despite the low quality of recording by class found it really easy to use compared with other recorders at the time.

In 2010 I was involved in supporting a class using 1–2–1 iPod touches, and blogged a fair bit about it I though. They had a great deal of potential for the primary classroom. The introduction of the iPad put paid to that. I still think that a pocketable device might have been useful in school. Reviewing these old posts I found quite a few records of efforts to develop ideas for using webpages for teaching and learning with iPods. I had a bit of fun with that.

In my fantasy classroom pupils would be equipped with iPod touches and MacBooks, maybe the lovely 11 inch Air.

I’ve been aware of Radiowaves for a long time, it was one of the inspirations for Radio Sandaig and started me podcasting. I have not followed the development of the site with a great deal of attention but have been aware that it has been evolving in interesting ways. This is what they say about themselves:

Radiowaves is the social learning environment that provides social media for education. It enables schools to create and safely share videos, podcasts and blogs. With a free Radiowaves website you can easily start school blogging, join national campaigns and develop digital literacy skills.

Over 50,000 pupils use Radiowaves regularly to broadcast their school podcasts and videos to friends and family via the safe social network.

I’ve also met Mark Riches CEO at Radiowaves (and founding director of NUMU which looks interesting too) a few times over the years and he talked about RadioWaves on EDUtalk at BETT. At that point he told me that they were working on an iOS app and I asked him to let me know when it came out. On Friday he did. I am really impressed with this free app.

I’ve not really got my head round the Radiowaves site, its features and how teacher and pupils sites work together, but I love the app and though it worth posting some information about it.

You can get a free account at Radiowaves, this allows unlimited blogging for a school but you are limited to 30 minutes of audio and video. I created a free account to test this app. I didn’t read any of the help or explanations either in the app or online, just clicked around.

Makewaves

Makewaves 1

The app is called Makewaves (iTunes link) and is free. It runs on an iPhone, iPod touch or iPad. On the ipad it runs as an iphone sized app but can be used at 2x size to fill the screen.

I really like the look and feel of this application. Simple and straightforward.A lot of recent apps that I’ve downloaded seem to be simpler and cleaner looking, less 3d drop shadows and gradients, more space and less colour.

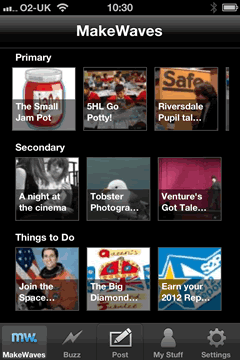
The app is split into 5 main sections accessed through the toolbar along the bottom:MakeWaves, Buzz, Post, My Stuff and Settings.

The MakeWaves screens shows three streams of posts from the site, primary, secondary and Things to Do. Clicking on thumbnails lets you access the content on the app.

The section I was really interested in was the Post one, but before I went there I need to visit the Settings and add my account details, this was straightforward although I didn’t notice the setting for default item which was story rather than blog. I am still not too sure of the difference between the two.

Makewaves 2

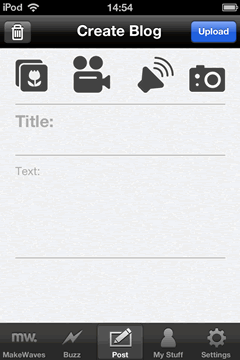
As soon as I saw the Post screen I liked it. 4 simple buttons at the top to upload media, Pictures from the camera roll, video, audio and the camera. The video button lets you choose from the camera roll or take a new video.

In seconds I had taken screenshot, used the Photo button to choose it, written a line of text and posted it.

I followed by testing the audio button, the app lets you record a sound and upload it, again a very straightforward process.

I then tested Video, and used an iPad and iPod Touch as well. All preformed beautifully.

Later on I used 3g to post a short audio file from outside. It worked a treat, uploading quickly.

An interesting feature of the app and radiowaves generally is the teacher approval. I was acting, I think, as both teacher and pupil so had to approve my own posts. The process is pretty simple on the radiowaves site and there is a in app purchase (£1.49) that lets you approve your pupils on the Buzz screen.

The My Stuff screen gives you a view of your stories and blogs, lets yuo know the ones that are still awaiting approval and the work of others in your station. You can also see if anyone liked your work.

The setting screen is straightforward, the place you can log in, easy too to log out and allow the same device to be used by more than one pupil.

I am extremely impressed with this app. It is the first one I have seen that allows posting of images, video and sound. (When I saw the posterous app I immediately put in a feature request for audio recording).

The application, when used on an iphone or ipod touch, is not built for long form blogging, but it is ideal for the much more interesting, in my opinion, mobile and group publishing of rich media. This is done in a way that minimises the technical barriers allowing users to concentrate on digital storytelling.

This could be an amazing tool for trip blogging. It should even be possible to have, say, several ipod touch out on a trip using one iphone’s tethering to allow mobile blogging by a group.

Finally having struggled and mostly failed to find a simple mobile blogging method for glow blogs it would be great to have a similar app in he new glow.

iTimeLapse

There are a horde of time lapse apps on the Apple iOS app store now. A while back I tested iMotion – Stop motion animation for iPhone and I’ve downloaded a few more.

Yesterday I noticed iTimeLapse had an update, listed in the fixes was – General crashy-ness fixed which sounded good and I decided to give it another try.

I set up my phone on the windowsill pointing at the trees and sky across the road. There is a choice of resolutions I choose 1280×960. I set the app to take a picture every 30 seconds and set it going. It seemed to be taking picture faster than that so I stopped, reset and started a few times (I even forced quit the app). Eventually I just let it do its own thing. After an hour or so it had taken 1333 images (Which the app tells me takes up 1339 mb on my phone) so I do not think that the Snap Interval is accurate/working! However the resulting video worked out fine.

On stopping the app you then have to render the video, my first attempt at one of the higher resolution settings failed, producing a block video, I tried again at a more sensible 640x 480 and this worked. The video was then watchable on my iPhone.

There are several export options, I tried the Vimeo option, which took a while but worked well and the Local WiFi Sharing.

I am a fan of a few other apps which have Local WiFi Sharing. Most apps that do this have a screen which shows an address to be typed into a browser, usually an IP address, although some support using bonjour in Safari. iTimeLapse does something different it show a link to TapShare.org with a 3 figure number. You visit TapShare on your desktop, type in the 3 figure number and that opens the local iP. TapShare is a service which offers this small utility to generate a 24 hour shortcode which can redirect to your local IP via an API which iOS developers can use. Being nosy I checked Safari and bonjour works too:

Leading to a webpage to download video:

iTimeLapse Safari

This video was 46MB in size and didn’t make it through my mail system to posterous, a quick export fromQuicktime, iphone setting, shrunk it to 9MB which upload fairly quickly: Evening Sky

Here is the Vimeo version:

I am sure this could be a useful app to use in the classroom for easily generating time lapse movies & animations.

I’ve illustrated this post with some screenshots, glued together in an animated gif, to save some screen space, please let me know if you think it is useful or annoying.

The practicalities of using iPods and iPads in classrooms. 


Chairperson:

  •   Iain Hallahan (@don_iain) 

Panelists:

     1. Fraser Speirs @fraserspeirs

     2. John Johnston @johnjohnston

     3. Gillian Penny @gillpenny

     4. Dan Bowen @dan_bowen  –  tbc

Areas for discussion:

  1. Network connectivity & IT support   
  2. iTunes account management & licensing issues 
  3. Authority/Department/Cluster/School policies on usage
  4. Is there a way to suggest changes to Apple? What might these suggestions be?  

This week I’ll be taking part in this online audio panel. Thanks to Iain Hallahan (@don_iain) for putting me forward. I am looking forward to hearing what the other panellists will be saying.

Ios movie thumbs

Over a month ago I started dumping screenshots of a few iPhone movie editors, iMovie, ReelDirector, Splice & Vimeo with the intention of writing a detailed comparison of the apps.

I’ve blogged before about taking and editing video in the classroom. I’ve found it a very valuable activity. Not big production stuff, more quick & dirty; gathering evidence, a change from writing a report etc. I think that iPod touches could be used to do this sort of work hopefully cutting out the computer from most of the work.

My notes and screenshots quickly got out of hand and I was heading for a lot more work than a blog post. I’ve decided just to post some of the main points here.

Part of the testing was to make with each of the apps a very short movie, combining a still, a couple of move clips, adding a background track and some titles (4 movies). I used the same media for all 4, a couple of very short clips and a photo of my colleague Ian’s birthday dalek.

This could by no means be described as a comprehensive review. I have tried to avoid reading any help and may have missed features completely. If I could not get a feature to work quickly an easily I gave up on it.

Project Screens

reeldirector
iMovie
SpliceVimeo movie list

All of the apps have a screen where you can see a list of your projects, iMove uses a series of thumbnails under a cinema canopy, the rest more conventional lists. Splice differs by only offering landscape, Vimeo only portrait. Vimeo also opens with a list of your published videos on Vimeo which you can watch (you can also see video from your inbox and likes). The video you are editing are in Recordings in thumbnail view.

All of these interfaces work iMovie is possibles slightly more awkward but not much.

Creating a new project.

iMovie takes you straight into the editing mode. The project can be named later on on the projects screen.

ReelDirector: clicking on the + on my projects opens a screen to tile your movie, add credits and set the default transition. Then you are taken to the edit screen. You can go back and edit the ‘properties’ at any time.

Splice: clicking on the + on the Projects screen adds a project to the top of the list and opens the keyboard to name the new project. Once named you are taken to the project settings screen.

Vimeo: you go to the Recordings screen and again hit the + a new icon for the project appears, clicking on this opens the Project Details screen, where you can title, open in video editor, add video clips, export or upload.

Again these all work well and are intuitive, I’ve a slight preference for iMovie which lets you get straight to work. iMovie is also the only one that opens the app at the last place you were working rather than the project list (ReelDirector & Vimeo do too unless you quit the app).

Adding media

Adding video and still images

  • iMovie: click on media button take you to a three tabbed screen; video, photos & audio. The video screen allows you to select a section of video from videos on your camera roll and add it to the project.

    Imovie import video

    The photo screen gives access to your photos and allows you to select one this is added to your project set at 4 seconds with a basic Ken Burns effect.

  • ReelDirector: clicking the + give you a dialog with a choice of media. Clicking Video/photo open up your camera roll. Clicking a video adds the whole clip to the timeline. Adding a photo adds it to the timeline as a 4 second still. You need to edit the image to add a Ken Burns effect.
  • Splice: when you create a new project the editor opens with buttons to add a choice of Video/Photo, Transition or Title. Clicking Video/Photo opens your photos and lets you add multiple photos and or video clips. You can move though different albums adding media by clicking and adding a tick. After you have selected a number you are asked if you want to add a transition to all of the selected media.

    Splice Import

  • Vimeo: in Vimeo you see the three tracks, video, titles & audio. Clicking at the + at the end of the video track allows you to choose a clip or still from your photo library. If you choose a still it comes in at 3 seconds. You can ‘Enable Basic Pan/Zoom Effect’ and easily adjust the length by dragging the handle at the end of the photo clip on the timeline.

The two standout import features are iMovie’s select a section og video and Splice’s multiple file import.

Adding audio

  • iMovie allows you to import audio from your iTune library, for the theme music in the app and sound affects. The sound affects go onto the time line where the playhead is but music track are placed along the whole movie. Adding another music track replaces the one that is there. You can have recorded sound orsound effects over background music.
  • ReelDirector allows you to import audio from the iPod library and the Imported Music library. What is really nice is that you upload music to this library via a web browser on the same wifi network. This is especially simple with Safari, you click bookmarks, then bonjour and then the name of your phone, a webpage allowing you to upload files is served from your phone. You have one audio track in addition to the video audio.
  • Vimeo allows you to pick music from its Audio Library, you can add music to this via USB & iTunes or vis Wifi unfortunately I could not get the Wifi to work, the webpage loaded but choosing and uploading a file produced a blank page in the browser and no MP3 on my phone, (With Firefox the upload button didn’t produce a file dialog). Luckily the USB/iTunes option worked very well.There is one Audio track in vimeo, I could not see a way to have voice, or sound effects and background music at the same time.
  • Splice allows you to two track with audio files and one recording track. Splice You can import audio from iTunes or from the Splice Library this comes with some sound effects and a couple of sound tracks, there is a button to buy more clicking this opens a screen were you can buy music, sound effects and borders. I’ve not bought any.

Splice Audio Edit

Titles

All the editors allow you to add titles

  • iMovie the titles style is linked to the theme you choose. A movie must have a theme.
  • ReelDirector allows you to have titles on any clip, to set text styles, placement and title styles.
  • Vimeo titles can be adjusted for placement, colour and size, not fonts choice.
  • Splice titles can only be on a block background not on a clip.

Reel Director Titles

Editing

The above briefly covers some of the main features of the apps but probably the most important part is the actual editing. An iPhone or ipod touch has very limited screen space and it is interesting to see how each app has handled this.

    • iMovie

      iMovie Edit

      most of the basic editing is done on the time line, the video is trimmed or the length of photo display is controlled using the yellow handles on the timeline screen, I found it much easier to do this in landscape orientation. Double tapping on a clip opens a screen to set titles volume control and delete the clip. As mentioned above the title stiles are limited by the theme set in the project properties. You can also delete the clip here. Changing the transition settings is done by double clicking on the transition. Transitions are limited to none, cross dissolve or a theme one, you can set the transition length too.

    • ReelDirector

      Reel Director Edit

      All of the editing is done on another clip apart from the audio volume which opens at the bottom of the screen. I found the trimming of clips to be rather tricky and am not sure if I really understand the interface. As noted above ReelDirector has more options than iMovie for titles and indeed transitions. You do not seem to be able to set transition lengths.

    • Vimeo

      Vimeo

      Clicking on a clip or still allows you to adjust the length with the handles, you can also set the in and out points manually in the pane at the top right of the screen, this swipes to other edits, volume, fit, pixel effect( filters) and a basic on off pan zoom effect. You can slide audio clips and title back and forth but I found in too difficult to get end credits at the end of my movie.

Splice

  • Splice Edit


clicking on a clip shows a set of small buttons to trim, adjust video speed, crop, duplicate or delete. clicking on most of these show another screen. The trim is at least as easy to manage as imovie and the Pan & Zoom (Ken Burns) very clear. The controls on splice are big enough not to miss a clip. Is, as far as I could see, is the only app to allow you to change the video speed. The Audio is reached from a different timeline view but offers similar trimming for the three audio tracks, fading in and out and volume control.

Export

  • iMovie you can export to your camera roll at Medium, 360p; large, 540p pr HG, 720p. You can also export to youtube, facebook, vimeo or send the project to iTunes. I’ve only sent to camera roll.
  • ReelDirector you need to Render a movie before exporting, the export give a choice of Camera roll, email or youtube.
  • Vimeo allows you to upload to your viemo account or export to camera roll. When you export it renders and then saves to the camera roll.
  • Splice, you first preview a movie then export the choice is medium 960 x 540 or High 1280 x 720.

Favourite things

  • iMovies basic ease of use, the app seems to jump screens less than any of the others. The ducking of background audio.
  • Splice the ability to add multiple photos and clips and the easy clip and still editing.3 audio tracks.
  • ReelDirector the way you can import audio over Wifi from a desktop. The titles are a strong point.

Dislikes

  • iMovie, the way the title tie in to themes
  • ReelDirector, felt like the most fidgety on the small screen although it probably has more features. (On the iPad it has a different interface and is great)
  • Splice titles, over black, not over clips
  • Vimeo just turned up in the iTunes store as I was reviewing the others, it feels a less mature product.

What I’d like the apps to do

I’d like more of them to support the favourite things above. Especially the multiple selection and audio import over Wifi.

Audio import, it is easy to grab images from the browser on an ipod (CC ones of course) but audio is more difficult. Im my dalek movies I used some CC music from soundcloud it would be great to be able to use an app to save audio for there or elsewhere to iTunes on an iPhone/iPod and use it. This would really cut down the need for a desktop.

What I’d use

For the most part I think I’d use iMovie on my iPhone. If splice had titles over video I’d pay for it and get rid of the ads. I am setting up some iPod touches for use in schools and an installing splice to save a few quid.

What I’d use it for

I’ve shot precious little video since owning an iPhone, thousands of photos and quite a lot of audio recordings I might start taking a few move videos now I’ve played with the apps.

If I was in class I’d use this all of the time, perfect for children to record all sorts of learning. I’d also use for making videos of still pictures with a recorded sound track, something I used to get my pupils to do on iMovie on the desktop. sonicPics woulds be easier for this sort of thing than the movie editors as you can easily adjust the length the stills play while recording audio. (I reviewed SonicPics)

Any of these apps would do a good job in the classroom, with the demise of the Flip camera it may be time to look at iPod touches as a video device for teaching & learning.


iPad stand by tim_d
Attribution-NonCommercial-ShareAlike License

I was pretty impressed with the iPad 2 which was launched this week. Some nice new features and the speed bumps especially in JavaScript sound good.

I’ve continued to test an iPad and this week I spent a wee bit of time using it to access glow. I’ve talked to a few pupils who access glow at home using an ipod touch, and have occasionally used my iPhone, but find it a bit of a strain on the eyes (The pupils I’ve talked to don’t seem to have the same problem).

On an iPad Glow works pretty well. The iPads limitation on now allowing file (picture) uploads in the browser is a bit of a draw back but a lot of the other feature are fine. Editing webparts works as well as it does on Safari on a mac. The text editor continues to frustrate me but I am resigned to avoiding it use by now.

I successfully posted to my glow blog: iPad Glow blogging without trouble. Again I could not upload photos, but it is easy to workaround using flickr, I used my flickr CC search toy which did the job and sorted the attribution.

The WYSIWYG editor did not work, but I was please to see that the html editor respected line breaks, adding paragraphs. typing <p> with an iPad is a bit slow.

I also tried using the iPad to edit a wiki page. Again WYSIWYG was turned off and this time there was no auto paragraphing. Again I could paste in the embed code for a flickr photo. The font size was a wee bit small for me, but would be fine for most youngsters.

What it would be nice to see would be support for the MetaWeblog API in glow blogs, this would allow the use of various apps to post to a glow blog. I guess it is hard to enable this due to the way glow accounts are matched to wordpress ones through shibboleth, if RM can manage this it would be make glow blogs a powerful tool for mobile learning.

.

rusty chain by shoothead
Attribution-NonCommercial-NoDerivs License

It has been a relatively long time since I posted here so I though I’d share some interesting looking things:

HiJack

is a hardware/software platform for creating cubic-inch sensor peripherals for the mobile phone. HiJack devices harvest power and use bandwidth from the mobile phone’s headset interface. The HiJack platform enables a new class of small and cheap phone-centric sensor peripherals that support plug-and-play operation. HiJack has been tested with the iPhone 3G/3GS/4G, iPod Touch, and iPad devices.

So it looks like this could be useful for all sorts of data collection on an iPod Touch or iPad.

29/365 (IPAD) by Jesus Belzunce
Attribution-NonCommercial-NoDerivs License

Fraser Speirs – Blog – How the iPad Wants to be Used Fraiser speaks with a ton of authority:

The iPad is an intensely personal device. In its design intent it is, truly, much more like a “big iPhone” than a “small laptop”. The iPad isn’t something you pass around. It’s not really designed to be a “resource” that many people take advantage of. It’s designed to be owned, configured to your taste, invested in and curated.

and I suspect he has hit this and many other nails on the head, but perhaps there are other models of use that are worth exploring. Certainly the iPad I am testing at work is an easy thing for my wife or daughter to grab for a quick wikipedia search. iPads also seem to me quite happy to be used for communal reading/watching. Given current economic climates I think we need to keep looking at these devices even if we are not in a position to implement cultural and institutional change. Although the optimal use of iPads may be as a personal device we need to keep our eyes open for other possibilities.

Locally the Glencairn iPod touch trial from last session got a nice write up in Nice touch: iPod device educates pupils subtly – Primary – TES Connect Update 2018 broken link, but found here.

I like the look of the iRig Mic which was posted to the UK ADE mail list. Not for sale yet.

I now seem to have downloaded well over 300 apps for iphone/ipod touch/iPad and need t ostart really thinking about what I want to carry in my pocket. But I just keep seeing things I want to try. The latest iPad App I’ve downloaded in Logo Draw. A free, add supported app for simple Logo programming on the iPad.

Logo Draw

I’ve always had a soft spot for Logo, even trying to make my own teaching toy. This one seems pretty straightforward, the sort of thing I can imagine a small group of children working on?

A while back I blogged about a simple iPod touch/iPhone web app I was working on for creating images with lunes tamped on them (iPod Touch Poems). Over the last week or two I’ve seen a couple of classes using it:

Both classes had a little problem with the app working properly when add to the iPod Touch home screen. It seems that:

<meta name="apple-mobile-web-app-capable" content="yes" />

Had crept back into the html. I’d found earlier that if this is present it stops he download of an image, and hence the poem, to an iPhone or iPod Touch’s Photos.

Please let me know if you use the lunes app and any problems (or success) you have. leave a comment here or tweet @johnjohnston.

Last session I was lucky enough to be involved with a small ipod touch pilot; Glencairn iPod and blogged about it and various iPod Touch things several times.

10ipodtouch FtgroupImage Courtesy of Apple

A few things have made me think about iPod touches in class recently that I though might be worth a blog post.

I’ve been using some new, to me, bits of software on my iPhone which have either classroom potential or some concepts that could be transferred to the classroom.

Wifi Photo Transfer (App Store) is a simple application that turns your iPhone or ipod touch into a web server which displays the photos on the device on a web browser on any computer (or iPad) on the same WiFi network:

Wifi Photo Transfer

The photos can easily be downloaded to the computers. The application show a single screen on the phone with an IP address that can be typed into your browser to see the photos. Even better with Safari you just click Bookmarks and then Bonjour where you will see your phone listed:

Bonjour

A click opens the webpage with out any tricky typing.

I imagine photos taken with a new camera equipped iPod being distributed to a class full of children without resort to cables or pen drives.

I mentioned The UK SoundMap in the previous post this mashup which adds Audioboo audio to a google map could be replicated for all sorts of sound recording in class. A map full of music recorded in classrooms around the world or some language swapping springs to mind.

I’ve also been using mappiness, the happiness mapping app to record how I am feeling when the app on my phone prompts me twice a day. This sort of collaborative data logging could be done through a google form on a touch.

The other stimlus for this post is the new ipod touch, this adds the long awaited still and video camera and in my mind turns the iPod touch into one of the most useful bits of tech you could have in a classroom.

A few possibilities:

  • A replacement of your camera and easy photo distribution. The low res (960×720) is not any sort of problem for classroom use when huge digital camera images can slow things down.
  • A replacement Flip (you can use Wifi Photo Transfer to download videos).
  • A video editor, I’ve tested ReelDirector (App Store) briefly and it seems as good a video editor as you would get for £2.39.
  • Air mouse, pass a touch around the class to control the computer connected to a projector for a Whiteboard substitute.
  • With the right software and a class set you have a response kit.
  • Nintendos lots of brain training type apps.
  • Many tasks that are normally carried out on desktops or laptops.

Comparing the £159 before vat price of iPods with the cost of a smartboard or a couple of laptops makes these a real option for expanding technology in the classroom.

I saw a tweet mentioning me and the Flickr Search and Stamp for the iPod touch project on Friday. Clicking the link took me to Searching for CC images – SHea iPod Touch Project a post on Ian Guest’s posterous about:

a year long project between two schools, one in the London area and the other in Yorkshire. Students in two classes will be loaned an iPod Touch, for use both in school and at home.

The post contains a youtube video of how to use the Flickr Search and Stamp on an iPod touch and the blog has a lot of other interesting iPod Touch educational information.

I had mentioned this tool in a blog post and added it to the Interesting Ways to use an iPod Touch in the Classroom collaborative google presentation but have not blogged about it here..

The idea was to get around some copyright issues for children searching for images to create with on an ipod touch. Ideally children would save a photo, figure to the attribution and edit the photo to add this. That can be quite difficult and time consuming on an iPod touch so I though up this workaround. It searches flickr, only returning images that can be used and edited under a cc license, it then will produce an image with the attribution stamped onto it in the same way as my flickr CC search toy.

Flickr cc attribution

It is based on the iPod Touch Poems webapp I knocked together and has quite a few rough edges. I am sure I could improve the performance, interface & a lot more but it seems to work.

Here is Ian’s video, which should give you an idea of how the app works:

I’ve added a link from the page/Web app to the video to act as in app help so many thanks Ian for this. You can also get an idea of it the app work in this Simulator.

I’d appreciate any feedback on using the app, especially in class and ideas for improving it.