I used to love Martin Hawksey’s tweet archive which I used for quite a while and mirrored on the web.
Yesterday I was reading Alan’s post: My Digital Cleanup: IFTTT – CogDogBlog which explains how he now archives toots with make.com a sort of ifttt replacement. This sounds very useful. I’ve quite often failed looking for old toots with the mastodon interface.
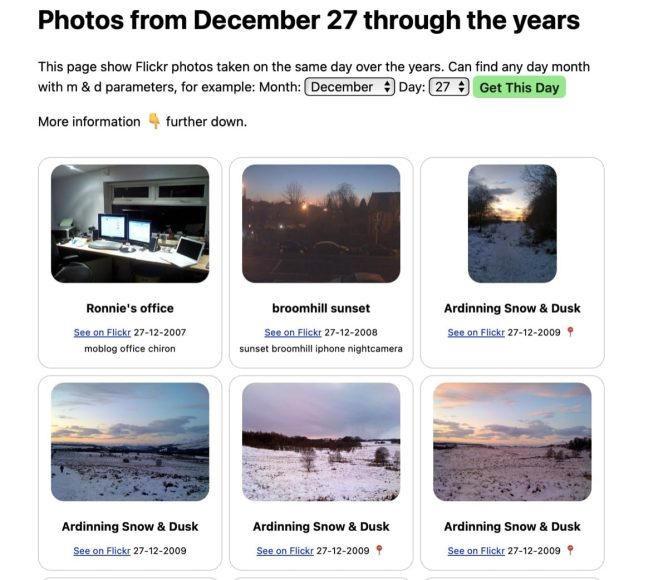
This made me think a bit. I’d been playing with json to sqlite for my flickr photos, On this Flickr Day. I wondered if I could do this with my toots too.
Turns out I could take a very similar approach:
A bash script pulls down all my previous toots to a sqlite database.
Another script updates the database.
A php file provides a search and display.
The search can be viewed in the browser using a simple php server.
There are a few things that could be improved.
I’ve not used any authentication. So I just get public toots and boosts. That is all I want.
The web page produced is pretty simple, if there is no search it shows all my toots. This is just over 1000 I probably need some pagination.
I’ve a version running on my raspberry pi. Search Toots this is organised slightly differently from the one I run locally on my mac. The scripts & database are not directly in the public_html directory.
I had a bit of AI help, bouncing ideas, tidying things up & especially all of the getting the files on git hub. I’ve done this so rarely I’d no recall of how to do it.
Worked a little on this especially for mobile. Using a css grid on desktop. I want to keep it as simple as possible.Still need a bit of a tidy. While I was searching I found out about Masonry which look like a nice way to go eventually. Introducing CSS Grid Lanes | WebKit is a good read.
Figure out a simple way to update the database without completely rebuilding it.
Just checking the last 100 photos on flickr once a day with a cron job. I just truncated the original script that built the database. I’ve uploaded a photo or two most days recently and it seems to be working. I could probably cut the numbers checked to 50, as I don’t upload many photos.
Decide on any extra fields and recreate the database.
Not done, but I think I want to add in a smaller image size so I can pull the json into WordPress and add tiny thumbs to my on this day page.
Figure out why I can’t get location information from the database with PHP I can with bash.
This sorted itself out once I check there was some location data for the image in the json when it is received.
I’ve continued to talk to claude.ai a bit in the process. But I’ve been careful to ask for it to discuss approaches & not give me code. I’ve tried to describe my ideas and situation and finish with Can you run through some options & idea, without code? or similar. This has been really helpful. I continue to search for answers to problems with DuckDuckGo too as in the pre ai days.
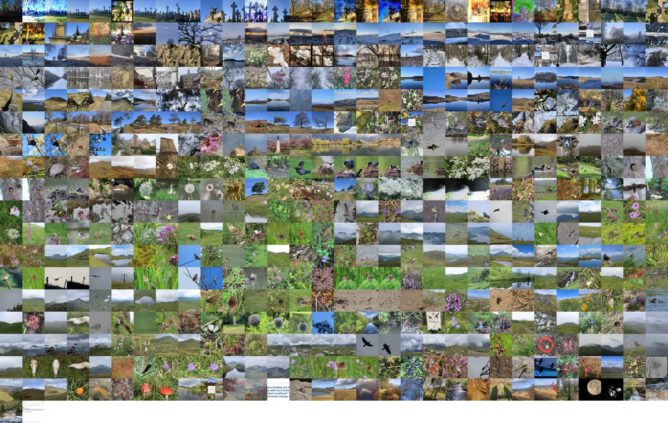
On This Flickr Day There is a bit more work on making this look nice, but it is a start.
I’ve been thinking about this for a while. A way to show Flickr photos taken “on this day”.
I’ve used the Flickr API occasionally over the years, but calling it directly would take too much time. You would need to page through all the photos 500 at a time until you had all the photos.
So I thought I might build a personal database with the information I needed. This could be updated weekly. I then could pull the information from that in one go. Especially if I store the days and months individually for each photo.
This is somewhat outside my skill set. I’ve used the Flickr Api but do not really know much about databases. In the dim past I think I’ve created them once or twice and used from PHP but with lots of searching.
I planned:
Create a local sqlite database on my mac
Move it to a server
access it from a web page with JavaScript via a PHP file to read the database.
I’ve got some way toward that. I did need a bit of help from claude.ai to get the bash sorted. I’ve just used simple PHP on the webpage so far and managed that with the odd search when I’ve hit an error.
I’ve been thinking a bit about using AI for this sort of thing. My current approach is to use it for specific questions. For example, asking is this a sensible approach, or asking for hep with a line. Rather than write me a whole script to do x, y or z. So I start a script then ask for help when stuck. In the same way I’d have to look up docs or search for the answer to a problem.
Hopefully my next step will be to, after a short interval, go through any files and comment as to what is going on to reinforce my learning.
As I am a complete amateur and do not have anyone to chat about this with, I find using AI quite good fun if I make sure to tell it not to give me whole solutions.
The other thing I’ve been trying with AI is to run any files through asking for them to give any security recommendations.
Next Steps
Create a way to produce JSON rather than a web page with PHP. I could then bring the thumbnails into this site using JavaScript.
Add some sort of lightbox to see the images larger, change the layout & appearance.
Figure out a simple way to update the database without completely rebuilding it.
Decide on any extra fields and recreate the database.
Figure out why I can’t get location information from the database with PHP I can with bash.
PlayPhrase will assemble a clip of movie scenes all having the same phrase, a small supercut if you will.
The results are slick and amusing.
I remember creating a few Supercuts using the amazing Videogrep python script. I thought I’d give it another go. I’ve made quite a few notes on using Videogrep before, but I think I’ve smoothed out a few things on this round. I thought I might write up the process DS106 style just for memory & fun1. The following brief summary assumes you have command line basics.
I decided to just go for people saying ds106 in videos about ds106. I searched for ds106 on YouTube and found quite a few. I needed to download the video and an srt, subtitle, file. Like most videos on YouTube there are not uploaded subtitles on any of the ds106 videos I choose. But you can download the autogenerated subtitles in vtt format and convert to srt with yt-dlp. The downloading and subtitle conversion is handled by yt-dlp2.
I had installed Videogrep a long time ago, but decided to start with a clean install. I understand very little about python and have run into various problems getting things to work. Recently I discover that using a virtual environment seems to help. This creates a separate space to avoid problems with different versions of things. I’d be lying if I could explain much about what these things are. Fortunately it is easy to set up and use if you are at all comfortable with the command line.
The following assumes you are in the terminal and have moved to the folder you want to use.
Create a virtual environment:
python3 -m venv venv
Turn it on:
source venv/bin/activate
Your prompt now looks something like this:
(venv) Mac-Mini-10:videos john$
You will also have a folder venv full of stuff
I am happy to ignore this and go on with the ‘knowledge’ that I can’t mess too much up.
Install Videogrep:
pip install videogrep
I am using yt-dlt to get the videos. As usual I am right in the middle when I realise I should have updated it before I started. I’d advise you to do that first.
You can get a video and generate a srt file form the YouTube auto generated:
Should download the video, the auto generated subtitles and convert them to a srt file!
I edit the video & srt file names to make then easier to see/type
Then you can run Videogrep:
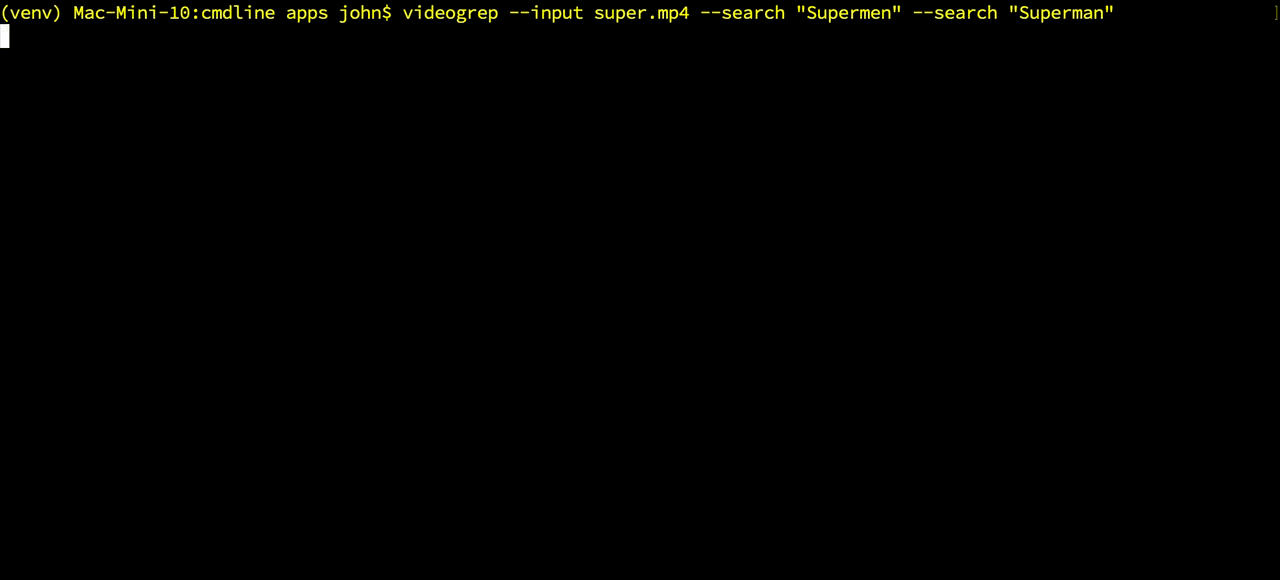
videogrep --input ds106.mp4 --search "ds106"
This makes a file Supercut.mp4 of all the bits of video with the text ‘ds106’ in the srt file.
I did a little editing of the srt file to find and replace ds-106 with ds106, and ds16 with ds106. I think I could work round that by using a regular expression in videogrep.
After trying that I realised I wanted a fragment not a whole sentence, for that you need the vtt file: I can dowmnload that with: yt-dlp –write-auto-sub –sub-lang en –skip-download “https://www.youtube.com/watch?v= tuoOKNJW7EY”
Then I rename the file to ds106.vtt delete the srt file and run
videogrep --input ds106.mp4 --search "106" –search-type fragment
I shortened ds106 to 106 as vtt files seem to split the text into ds and 106.
I ended up with 4 nice wee Supercut files. I could have run through the whole lot at once but I did it one at a time.
I thought I could join all the videos together with ffmpeg, but ran into bother with dimensions and formats so I just opened up iMovie and dragged the clips in.
at the end close the virtualenv with deactivate
reactivate with
source venv/bin/activate
This is about the simplest use of videogrep, it can do much more interesting and complex things.
I am retired, it is raining & Alan mentioned it might be a good idea. ↩︎
As usual made with few tweaks of this gist. The featured image made with a similar script. Got a tag for these things now: flickr year, need to find a few posts. I’ve been doing these since 2014 time flies!
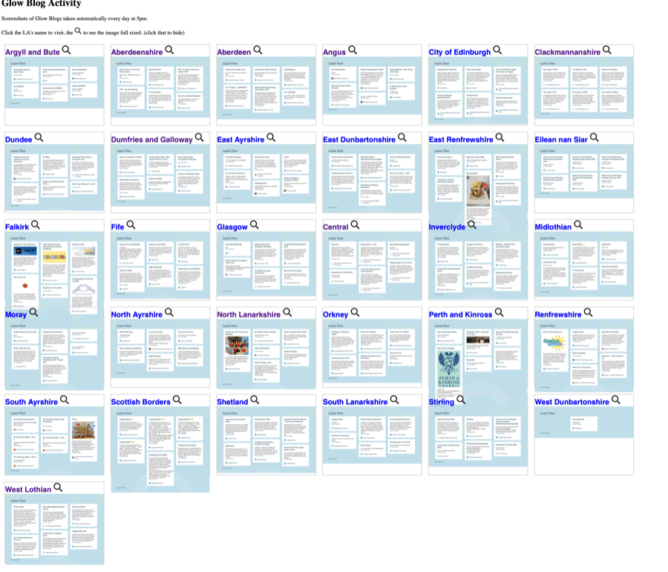
One of the things I am interested in as part of my work on Glow Blogs is what people are using Glow Blogs for.
Glow Blogs is made of of 33 different WordPress multi-sites. One for each Local Authority in Scotland and one central one.
The home page of each LA lists the last few posts. Visiting these pages will give you an idea of what is going on. In the past I’ve opened up each L.A. in a tab in my browser and gone through them. I had a script that would open them all up. I’ve now worked out an easy way to give a quick overview.
Recently I noticed shot-scraper ,Tools for taking automated screenshots of websites . I’ve used various automatic webpage screenshot pages in the past. These have usually been services that either charge money or have shut down. I used webkit2png a wee bit, but ran into now forgotten problems, perhaps around https?
shot-scraper can be automated and extended. It is a command line tool and using these is always an interesting struggle. I usually just follow any instructions blindly, searching any problems as I go. In this case it didn’t take tool long.
Once installed shot-scraper is pretty easy to use. shot-scraper https://johnjohnston.info Dumps an image johnjohnston-info.png
There are a lot of options, you can output jpegs rather than pngs. Run some javascript before taking a screenshot or wait for a while. you can even choose a section of the page to grab.
So I can use shot-scraper to create screenshots of each LA homepage. Then display them on a web page for a quick overview of Glow Blogs.
    #!/bin/bash

    cd /Users/john/Documents/scripts/glowscrape/img

    URLLIST="ab as ac an ce cl dd dg ea ed el er es fa fi gc glowblogs hi in mc my na nl or pk re sa sb sh sl st wd wl"
    for i in $URLLIST ;
    do
        /usr/local/bin/shot-scraper -s "#glow-latest-posts" -j "jQuery('.pea_cook_wrapper').hide()" --quality 80 https://blogs.glowscotland.org.uk/"$i" -o  "$i".jpg && continue
    done;
This first hides the cookie banner displayed by blogs and then screenshots the #glow-latest-posts section of the page only.
The script continues by copying the image over to my raspberry pi where they are shown on a web page
I hit a couple of problems along the way. The first was that the script stopped running when it could not find the #glow-latest-posts section. This happens on a couple of LAs who have no public blogs. adding && continue to the screenshot fixed that.
The second problem came when I wanted to run the script regularly. OSX schedules tasks with launchd. I’ve used Lingon X to schedule a few of these. Since I recently updated my system I first needed to get a new version of Lingon X. I then found that increased security gave me a few hoops to jump through to get the script to run.
I think it would have been simpler to do the whole job on a raspberry pi. But I was not sure if it would run shot-scraper. I’ll leave that for another day and a newer pi.
This is a pretty trivial use of a very powerful tool. I’ve now got a webpage that gives me a quick overview of what is going on in Glow Blogs and took another baby step in bash.
The first thing that surprised me was the lack of featured Images on the blog posts. These not only make the LA home pages took nicer they also make display blog posts on twitter more attractive.
Since 2014 I’ve been making “movies” with my flickr photos for the year. I make them with a script which downloads the years photos puts them together into a movie and, use to, add music. The Music bit is broken (https) so I downloaded some manually.
This year pretty much stopped in October, then I got covid in November and have not been out much since.
I also average the photos ( below) and montage them for the featured image. This year I made a version of the script to download wee square images for the montage (average & montage scripts here).
I enjoy both the process and watching my photos flickr by. I like the fact that I can easily tweek bit of the script or run the video creation again quickly to try out different speeds, music etc.
Sometimes working on forward plans includes a deal of tedium reorganising text. Time to google some geekiness. (I know a spreadsheet would do this but where is the fun in that)
After seeing @adders on micro.blog posting some timelapse I though I might have another go. My first thought was to just use the feature built into phone. I then though to repurpose a raspberry pi. This lead to the discovery that two of my PIs were at school leaving only one at home with a camera. This we zero had dome sterling service taking over 1 million pictures of the sky and stitching them into 122918 gifs and posting them to tumblr. I decommissioned that when tumblr started mistaking these for unsuitable photos.
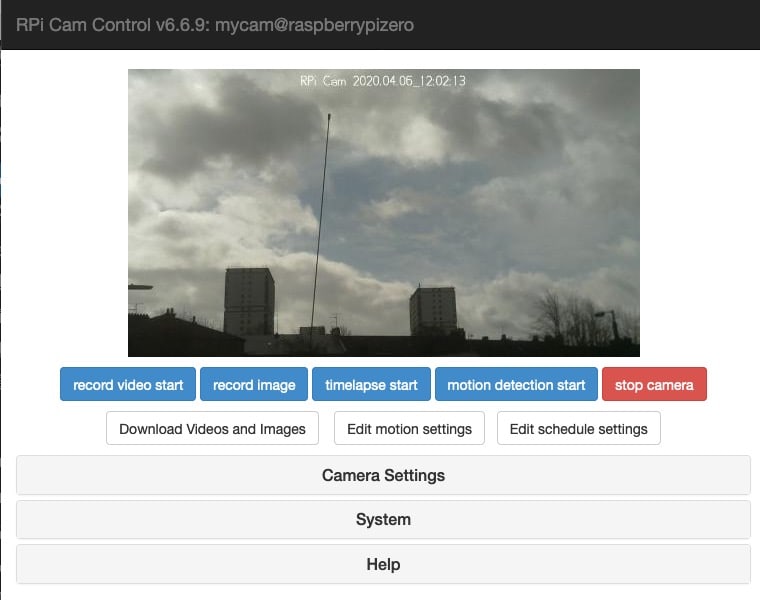
My first idea were just write a simple bash script that would take a pic and copy it to my mac. I’ve done that before, just need to timestamp the image names. Then I found RPi-Cam-Web-Interface. This is really cool. It turns your pi into a camera and a webserver where you can control the camera and download the photos.
I am fairly used to setting up a headless pi and getting on my WiFi now. So the next step was just to follow all the instructions from the RPi-Cam-Web-Interface page. The usual fairly incomprehensible stuff in the terminal ensued. All worked fine though.
I then downloaded the folder full of images onto my mac and stitched them together with ffmpeg.
ffmpeg is a really complex beast, I think this worked ok:
make a list of the files with
for f in *.jpg; do echo "file '$f'" >> mylist.txt; done