Here are some tips for speeding up the process of making simple posts to a Glow Blog

Preparation 1. The Post Editor

One of the nice things about the WordPress Post Editor is you can customise the elements that you see on the screen.

Blogs Post Screen Options

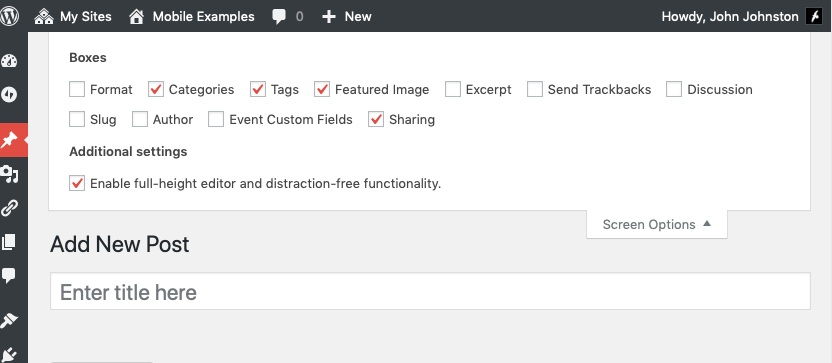
To make my posting simpler in mobile I’ve removed some elements and dragged the Featured Image section to the top of the right hand column. This makes it appear right under the post content in the mobile view.
Blogs Post Featured
You can also collapse section of the editor you don’t need all the time, I’ve notice my pupils do this when using their e-Portfolios.

Preparation 2. Bookmark New Post

On my phone I’ve bookmarked the New Post Page on blogs I want to post to.

New Post Add To Homescreen

Im my case I’ve saved it to my home screen so I don’t even need to open my browser and go through my bookmarks.

This means that I can go straight to the new post page. If I am not logged onto Glow I am taken through the RM Unify password screen first. I use the save password facility on my phone to speed this up.

Featured Images

Editing a post with images and text can get a little messy, and therefore slow, on mobile. If I want to make a quick post, I don’t put the images in the editor, but use the featured image feature. This adds an image, typically, to the top of your post, and keeps it clear of the text.

Putting it All Together

Using my home screen icon, saved password, simplified new post page and a featured image means I can post a twitter sized post and picture in around 90 seconds.
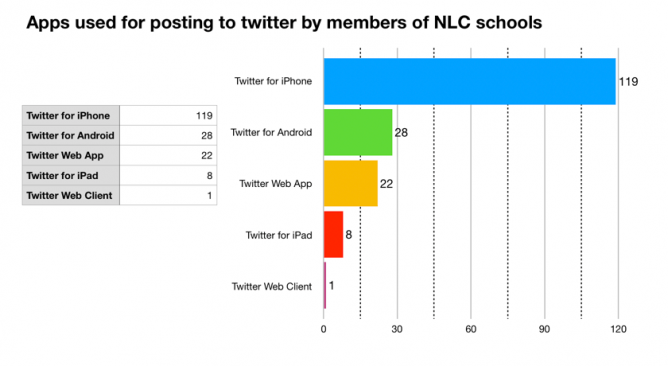
Twitter too

In case you are missing the interaction and publicity of twitter you can of course auto post your blog to twitter using several free services, dlvr.it, IFTTT and Microsoft Flow (using your glow account.)

graph of number twitter clients used by schools

I’ve talked to a fair number of teachers who find it easier to use twitter than to blog to share their classroom learning. I’ve been thinking a little of how to make that easier but got side tracked wondering how schools, teachers and classes use twitter.

If you use twitter on the web it tells you the application used to post the tweet. At the bottom of a tweet there is the date and the app that posted the tweet.

I’ve got a list that is made up of North Lanarkshire schools I started when I was supporting ICT in the authority.

I could go down the list and count the methods but I though there might be a better way. I recalled having a played with the twitter api a wee bit so searched for and found: GET lists/statuses — Twitter Developers. I was hoping ther was some sort of console to use, but could not find one, a wee bit more searching found how to authenticate to the api using a token and how to generate that token. Using bearer tokens

It then didn’t take too long to work out how to pull in a pile of status updates from the list using the terminal:

curl --location --request GET 'https://api.twitter.com/1.1/lists/statuses.json?list_id=229235515&count=200&max_id=1225829860699930600' --header 'Authorization: Bearer BearerTokenGoesHere'

This gave me a pile of tweets in json format. I had a vague recollection that google sheets could parse json so gave that a go. I had to upload the json somewhere I could import it into a sheet. This felt somewhat clunky. I did see some indications that I could use a script to grab the json in sheets, but though it might be simpler to do it all on my mac. More searching, but I fairly quickly came up with this:

curl --location --request GET 'https://api.twitter.com/1.1/lists/statuses.json?list_id=229235515&count=200&' --header 'Authorization: Bearer BearerTokenGoesHere' | jq '.[].source' | sed -e 's/<[^>]*>//g' | sort -bnr | uniq -c | sort -bnr

This does the following:

  1. download the status in json format
  2. passes it to the jq application (which I had installed in the past) which pulls out a list of the sources.
  3. It is then passed to sed which strips the html tags leaving the text. (I just search for this, I have no idea how works)
  4. next the list is sorted
  5. then uniq pulls out the uniq entries and counts then
  6. Finally sorts the counts and gave:
119 "Twitter for iPhone"
  28 "Twitter for Android"
  22 "Twitter Web App"
   8 "Twitter for iPad"
   1 "Twitter Web Client"

This surprised me. I use my school iPad to post to twitter and sort of expected iPads to be highest or at least higher.

It maybe that the results are skewed by the Monday, Tuesday holiday and 2 inservice days, so I’ll run this a few times next week and see. You can also use a max_id parameter so I could gather more than 200 (less retweeted content) tweets.

This does give me the idea that it might be worth explaining how to make posting to Glow Blogs simpler using a phone.

Update, Friday, bacn to school and NLC looks like:

 74 "Twitter for iPhone"
  51 "Twitter for iPad"
  18 "Twitter for Android"
  10 "Twitter Web App"
   1 "dlvr.it"

I’ve often made an end of year posts reviewing my blogging. I though this year I might review my blog reading. These are a few of the sites I’ve enjoyed. The blogs I try not to miss and some I would love to be able to emulate.

Cogdog blog. Alan’s blog has been a constant in my life for years. Discussing sharing, sharing WordPress code and more wrapped in a real life with a real voice. I follow Alan wherever he roams.

Read Write Collect is my main education hosepipe filter. Aaron reads and comments on a huge range of educational and web tech blogs wrapped in a tasty IndieWeb coating.

I spend more time on the gentle, eclectic Micro.blog community/aggregator than social networks nowadays. @smokey is a one man community engine nearly every week he produces a post with a list of posts and pictures he has picked out. A few of us tried this for a while, as far as I know @smokey is the only one to have kept it up.

I love Tom Woodward’s Weekly Web Harvest which I think might be auto generated from pinboard. The rest of the blog certainly isn’t auto generated but is a must read too.

Scripting News

Tom Smith, I follow across twitter, Instagram and now his blog. Creative Chaos.

ScotEduBlogs, an aggregation of Scottish Educational bloggers. I run this as a gift to the community, but also because it means it is easy to read great stuff from across Scottish education at all levels.

I read a lot more via RSS. My twitter browsing has decreased but I have a couple of private lists one called regular & one for primary classroom folk.

I continue to find some really good resources on twitter. I do wish more of the teachers sharing would use a blog. (much easier to keep track of, organise etc). If they are in Scotland they could join in ScotEduBlogs too.

Featured image from Image from page 285 of “Studies in reading; teacher’s manual” (1919) on flickr no known copyright restrictions.

Garpel Water

I’ve just changed the front page of my blog.

For the last few years most of the posts I write have not made it onto the front page, ending up in the status page instead. Now everything is going to the home page.

At the end of 2014 I started experimenting with some IndieWeb technology on my blog. In 2017 I started using the beta version of micro.blog, this meant I was posting on a wider variety of topics with lots of short status type posts.

I decided to keep these off the home page, reserving that for posts categorised as wwwd posts that were longer and about ‘Teaching, ict, and suchlike’. I added a status link to my menus along with a photos page. Now I’ve move back to everything on the home page.

As time went on my blogging has branched out to include recording the books I’ve read and films I’ve watched and other things. Some, not all yet, of my tweets and some of my replies to other blogs are now posted on this blog and auto post to twitter and the blog I am commenting on. I manually post the same photos to instagram as I do here and Bridgy brings back my comments to the blog.

I am not exactly breaking new indieweb ground her or even pushing very hard, but I am enjoying expanding my blogging, pulling in content posted elsewhere is the past and bringing my digital life a little closer together. I’ve changed the Status menu to Articles in case anyone is only interested in longer, likely educational, posts. As I blog more I see my blog as primarily for me with some added benefits from sharing.

Featured images, my own, the Garpel Water in Ayrshire an meandering stream.

As I’ve mentioned before we use Apple Notes a lot in our class. If the class are writing, unless there is a need for formatting or layout, I often ask the pupils just to stick to notes.

Notes are easily AirDropped to me when I need to collect work and both pupils and myself can organise them in a fairly simple manner.

Occasionally I want to print the pupils work. Notes, reasonably enough, only lets you to print one note at a time. I wondered if there was AppleScript that would help. I found Export Apple Notes via AppleScript which exported a folder of notes to a new TextEdit document. I altered it to:

  • Allow you to choose a folder from Notes.
  • Export to an html file on disk.
  • Provided page breaks so that the notes would each print on their own page.

Not particularly pretty, I guess I could work on the styles a little.

You need to be in my lucky position of having a mac in your classroom. Mine uses the same account as my iPad which helps me organise thing a lot.

Here is the code, I suspect it could be improved. Even if you don’t use AppleScript is easy enough to run. Open the AppleScript editor, create a new script, paste the code below in and hit run. You will be asked to choose a folder and then name an html file. The file will be created and opened with your default browser.
You then can print.


set htmltop to "<!doctype html>
<html lang=\"en\">
<head>
<meta charset=\"utf-8\">
<title>Notes Export</title>
<style>
@media print {
hr {
page-break-after: always;
}
}
</style>
</head>
<body>"
set htmlbottom to "</body>
</html>"
tell application "Notes"
activate
set x to (name of every folder whose name is not "Notes")
set foldertoexport to (choose from list x) as string
if folder foldertoexport exists then
set output to ""
repeat with aNote in notes in folder foldertoexport
set noteText to "<!– ### Start Note ### –>
"
set noteText to noteText & ("<h1>" & name of aNote as string) & "</h1>
"
— set noteText to noteText & ("<p>Creation Date: " & creation date of aNote as string) & "</p>"
— set noteText to noteText & ("<p>Modification Date: " & modification date of aNote as string) & "</p>"
set noteText to (noteText & body of aNote as string) & "<hr>
"
set output to output & noteText
end repeat
set thehtml to htmltop & output & htmlbottom
set theNewFile to choose file name default name foldertoexport & "-notes.html"
set myFile to open for access theNewFile with write permission
write thehtml to myFile as «class utf8»
close access myFile
else
display dialog "not likly to happen"
end if
end tell
tell application "Finder" to open theNewFile

I’ve been having a wee play with the p5.js web editor.

p5 .js is a JavaScript library that starts with the original goal of Processing, to make coding accessible for artists, designers, educators, and beginners, and reinterprets this for today’s web. Using the original metaphor of a software Sketchbook, p5 .js has a full set of drawing functionality. However, you’re not limited to your drawing canvas, you can think of your whole browser page as your sketch! For this, p5 .js has addon libraries that make it easy to interact with other HT ML5 objects, including text, input, video, webcam, and sound.

I’ve occasionally dipped my toe into processing and found it good fun.

Over the summer I’ve seen a stream of tweets and instagram posts from Tom Smith which got me interested in p5.js.

I don’t really have much of a clue but have had a bit of fun. Especially when I found you can use a library with p5.js to export gifs. The feature image on this post is one made by my sketch: Classy bramble skulls 4. This one has a background image, some animation, the mid-ground, the sleeper and computer and then the window frame which are drawn. If I had though I’d have used 3 image layers sandwiching 2 animation ones. Early days.

There seems to be a ton of learning material available and it is easy to duplicate interesting p5.js sketches to edit and play around with. (The school holidays are not long enough;-))