As a follow up to the previous post I took some photos a few short videos and recorded some mp3s on a walk on Friday.

The idea was to knit them together quickly into movie.

I started with Splice the first rather ambitious attempt to import 60 stills and have a dozen videos crashed the app. I found that I could import a dozen at a time worked until I hit about 50 the app then crashed, multiple attempts to open the project again failed and I moved on to iMovie.

Importing image one at a time was a bit tedious, so I only managed about 40, along with 5 or 6 short video segments (10-15 seconds each) by the time I’d added all of these iMovie had become a little sluggish but it was still possible to edit.

I suspect that the Splice crash & iMove sluggishness were caused by the number of clips as opposed to the short total length. This is probably not the best use of an ios video editor.

I was disappointed to find that I could not use the extra audio recorded even after I had move it into iTunes and synced it with my phone. Although I could select the audio files they did not appear in the movie. I expect that even if they had they would have acted as background music rather than movable sound effects.

I exported the movie a couple of times, first as HD- 720p which resulted in a 272mb movie on my desktop. Then as a Large – 540p movie this was 141MB
Both saved as iPhone movies with QuickTime to 22MB, this for a 3 and a half minute movie.

Ios movie thumbs

Over a month ago I started dumping screenshots of a few iPhone movie editors, iMovie, ReelDirector, Splice & Vimeo with the intention of writing a detailed comparison of the apps.

I’ve blogged before about taking and editing video in the classroom. I’ve found it a very valuable activity. Not big production stuff, more quick & dirty; gathering evidence, a change from writing a report etc. I think that iPod touches could be used to do this sort of work hopefully cutting out the computer from most of the work.

My notes and screenshots quickly got out of hand and I was heading for a lot more work than a blog post. I’ve decided just to post some of the main points here.

Part of the testing was to make with each of the apps a very short movie, combining a still, a couple of move clips, adding a background track and some titles (4 movies). I used the same media for all 4, a couple of very short clips and a photo of my colleague Ian’s birthday dalek.

This could by no means be described as a comprehensive review. I have tried to avoid reading any help and may have missed features completely. If I could not get a feature to work quickly an easily I gave up on it.

Project Screens

reeldirector
iMovie
SpliceVimeo movie list

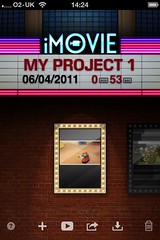
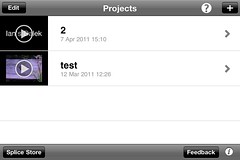
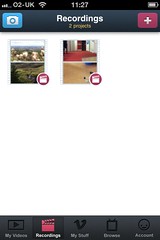
All of the apps have a screen where you can see a list of your projects, iMove uses a series of thumbnails under a cinema canopy, the rest more conventional lists. Splice differs by only offering landscape, Vimeo only portrait. Vimeo also opens with a list of your published videos on Vimeo which you can watch (you can also see video from your inbox and likes). The video you are editing are in Recordings in thumbnail view.

All of these interfaces work iMovie is possibles slightly more awkward but not much.

Creating a new project.

iMovie takes you straight into the editing mode. The project can be named later on on the projects screen.

ReelDirector: clicking on the + on my projects opens a screen to tile your movie, add credits and set the default transition. Then you are taken to the edit screen. You can go back and edit the ‘properties’ at any time.

Splice: clicking on the + on the Projects screen adds a project to the top of the list and opens the keyboard to name the new project. Once named you are taken to the project settings screen.

Vimeo: you go to the Recordings screen and again hit the + a new icon for the project appears, clicking on this opens the Project Details screen, where you can title, open in video editor, add video clips, export or upload.

Again these all work well and are intuitive, I’ve a slight preference for iMovie which lets you get straight to work. iMovie is also the only one that opens the app at the last place you were working rather than the project list (ReelDirector & Vimeo do too unless you quit the app).

Adding media

Adding video and still images

  • iMovie: click on media button take you to a three tabbed screen; video, photos & audio. The video screen allows you to select a section of video from videos on your camera roll and add it to the project.

    Imovie import video

    The photo screen gives access to your photos and allows you to select one this is added to your project set at 4 seconds with a basic Ken Burns effect.

  • ReelDirector: clicking the + give you a dialog with a choice of media. Clicking Video/photo open up your camera roll. Clicking a video adds the whole clip to the timeline. Adding a photo adds it to the timeline as a 4 second still. You need to edit the image to add a Ken Burns effect.
  • Splice: when you create a new project the editor opens with buttons to add a choice of Video/Photo, Transition or Title. Clicking Video/Photo opens your photos and lets you add multiple photos and or video clips. You can move though different albums adding media by clicking and adding a tick. After you have selected a number you are asked if you want to add a transition to all of the selected media.

    Splice Import

  • Vimeo: in Vimeo you see the three tracks, video, titles & audio. Clicking at the + at the end of the video track allows you to choose a clip or still from your photo library. If you choose a still it comes in at 3 seconds. You can ‘Enable Basic Pan/Zoom Effect’ and easily adjust the length by dragging the handle at the end of the photo clip on the timeline.

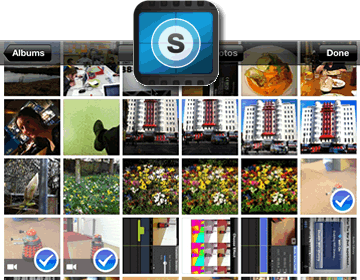
The two standout import features are iMovie’s select a section og video and Splice’s multiple file import.

Adding audio

  • iMovie allows you to import audio from your iTune library, for the theme music in the app and sound affects. The sound affects go onto the time line where the playhead is but music track are placed along the whole movie. Adding another music track replaces the one that is there. You can have recorded sound orsound effects over background music.
  • ReelDirector allows you to import audio from the iPod library and the Imported Music library. What is really nice is that you upload music to this library via a web browser on the same wifi network. This is especially simple with Safari, you click bookmarks, then bonjour and then the name of your phone, a webpage allowing you to upload files is served from your phone. You have one audio track in addition to the video audio.
  • Vimeo allows you to pick music from its Audio Library, you can add music to this via USB & iTunes or vis Wifi unfortunately I could not get the Wifi to work, the webpage loaded but choosing and uploading a file produced a blank page in the browser and no MP3 on my phone, (With Firefox the upload button didn’t produce a file dialog). Luckily the USB/iTunes option worked very well.There is one Audio track in vimeo, I could not see a way to have voice, or sound effects and background music at the same time.
  • Splice allows you to two track with audio files and one recording track. Splice You can import audio from iTunes or from the Splice Library this comes with some sound effects and a couple of sound tracks, there is a button to buy more clicking this opens a screen were you can buy music, sound effects and borders. I’ve not bought any.

Splice Audio Edit

Titles

All the editors allow you to add titles

  • iMovie the titles style is linked to the theme you choose. A movie must have a theme.
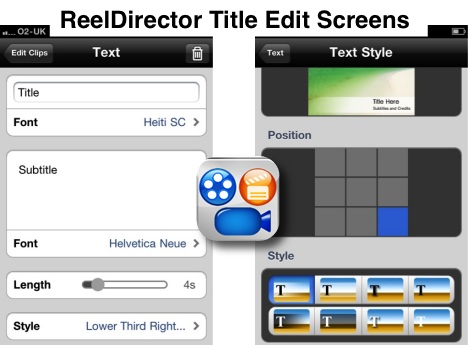
  • ReelDirector allows you to have titles on any clip, to set text styles, placement and title styles.
  • Vimeo titles can be adjusted for placement, colour and size, not fonts choice.
  • Splice titles can only be on a block background not on a clip.

Reel Director Titles

Editing

The above briefly covers some of the main features of the apps but probably the most important part is the actual editing. An iPhone or ipod touch has very limited screen space and it is interesting to see how each app has handled this.
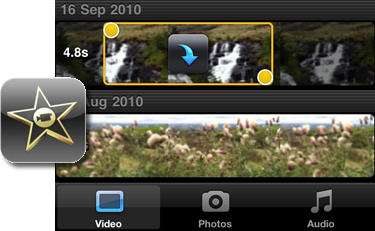
    • iMovie

      iMovie Edit

      most of the basic editing is done on the time line, the video is trimmed or the length of photo display is controlled using the yellow handles on the timeline screen, I found it much easier to do this in landscape orientation. Double tapping on a clip opens a screen to set titles volume control and delete the clip. As mentioned above the title stiles are limited by the theme set in the project properties. You can also delete the clip here. Changing the transition settings is done by double clicking on the transition. Transitions are limited to none, cross dissolve or a theme one, you can set the transition length too.

    • ReelDirector

      Reel Director Edit

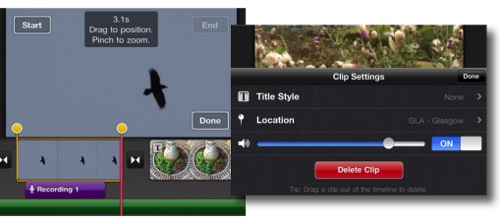
      All of the editing is done on another clip apart from the audio volume which opens at the bottom of the screen. I found the trimming of clips to be rather tricky and am not sure if I really understand the interface. As noted above ReelDirector has more options than iMovie for titles and indeed transitions. You do not seem to be able to set transition lengths.

    • Vimeo

      Vimeo

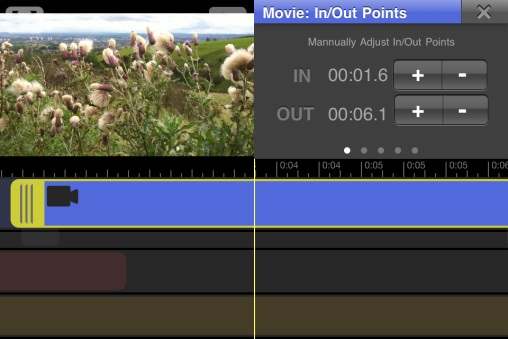
      Clicking on a clip or still allows you to adjust the length with the handles, you can also set the in and out points manually in the pane at the top right of the screen, this swipes to other edits, volume, fit, pixel effect( filters) and a basic on off pan zoom effect. You can slide audio clips and title back and forth but I found in too difficult to get end credits at the end of my movie.
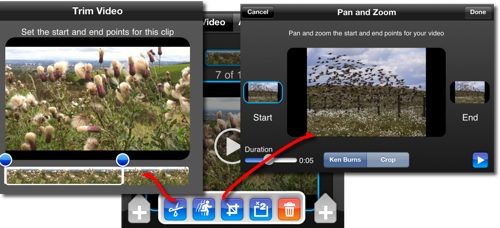
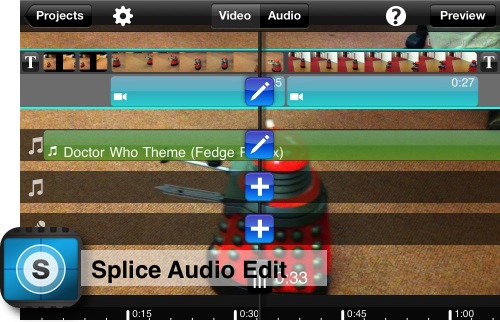
Splice

  • Splice Edit


clicking on a clip shows a set of small buttons to trim, adjust video speed, crop, duplicate or delete. clicking on most of these show another screen. The trim is at least as easy to manage as imovie and the Pan & Zoom (Ken Burns) very clear. The controls on splice are big enough not to miss a clip. Is, as far as I could see, is the only app to allow you to change the video speed. The Audio is reached from a different timeline view but offers similar trimming for the three audio tracks, fading in and out and volume control.

Export

  • iMovie you can export to your camera roll at Medium, 360p; large, 540p pr HG, 720p. You can also export to youtube, facebook, vimeo or send the project to iTunes. I’ve only sent to camera roll.
  • ReelDirector you need to Render a movie before exporting, the export give a choice of Camera roll, email or youtube.
  • Vimeo allows you to upload to your viemo account or export to camera roll. When you export it renders and then saves to the camera roll.
  • Splice, you first preview a movie then export the choice is medium 960 x 540 or High 1280 x 720.

Favourite things

  • iMovies basic ease of use, the app seems to jump screens less than any of the others. The ducking of background audio.
  • Splice the ability to add multiple photos and clips and the easy clip and still editing.3 audio tracks.
  • ReelDirector the way you can import audio over Wifi from a desktop. The titles are a strong point.

Dislikes

  • iMovie, the way the title tie in to themes
  • ReelDirector, felt like the most fidgety on the small screen although it probably has more features. (On the iPad it has a different interface and is great)
  • Splice titles, over black, not over clips
  • Vimeo just turned up in the iTunes store as I was reviewing the others, it feels a less mature product.

What I’d like the apps to do

I’d like more of them to support the favourite things above. Especially the multiple selection and audio import over Wifi.

Audio import, it is easy to grab images from the browser on an ipod (CC ones of course) but audio is more difficult. Im my dalek movies I used some CC music from soundcloud it would be great to be able to use an app to save audio for there or elsewhere to iTunes on an iPhone/iPod and use it. This would really cut down the need for a desktop.

What I’d use

For the most part I think I’d use iMovie on my iPhone. If splice had titles over video I’d pay for it and get rid of the ads. I am setting up some iPod touches for use in schools and an installing splice to save a few quid.

What I’d use it for

I’ve shot precious little video since owning an iPhone, thousands of photos and quite a lot of audio recordings I might start taking a few move videos now I’ve played with the apps.

If I was in class I’d use this all of the time, perfect for children to record all sorts of learning. I’d also use for making videos of still pictures with a recorded sound track, something I used to get my pupils to do on iMovie on the desktop. sonicPics woulds be easier for this sort of thing than the movie editors as you can easily adjust the length the stills play while recording audio. (I reviewed SonicPics)

Any of these apps would do a good job in the classroom, with the demise of the Flip camera it may be time to look at iPod touches as a video device for teaching & learning.

On Friday evening I went along to the evening presentation and discussion part of this event. There had been an afternoon training workshop on the practicalities of field recording run by the evenings presenters which was limited in numbers. My attention to the event had been aroused by a tweet from @scottishmusic I guess because I post the odd recording to the UK Sound Map. The evening was a little bit different from the educational conference/teachmeet meetings that I am more likely to be found at but I am really glad I went.

Tim Nunn

The first presentation was by theatre maker Tim Nunn of the company Reeling & Writhing (404 Archive link). He spoke about his work in progress Formel, inspired by Chaucer’s Assembly of Fowls the play uses field recordings extensively. Tim spoke about how he wrote the play working back and forward between text & field recording each affecting the other. A lot of the sound was recorded on Islay and he played us fragments of a force 10 gale and rooks mobbing an eagle. Here is a taste of the play I found on the Formel page

‘Formel’ by Tim Nunn, trailer by timjnunn

Tim mentioned RJ McConnell (site gone, archive link) as the person behind the sound of the play, whose blog will take you in other interesting aural directions

Formel has had a couple of preview performances and is due to be on tour at he end of this year or the start of the next (as far as I picked up) and is certainly something I would like to go along to.

Timothy Cooper

Next we heard from Timothy Cooper Timothy let us here kaktos the sounds of this were made by plucking of cactus spines. He showed us Postcards from blast beach which featured photos by his father and sounds recorded and edited by Timothy. A quick google found the video on My Space.

Next he played Skate ‘n’ Shuttle/Roll and Smash:


Skate n Shuttle/Roll and Smash by tim_bo

As someone who is as musical as a turnip I can’t really comment on the work, other than to say I enjoyed listening to it. The Blast Beach images & sound was interesting in being a very much polished combination of photos and edited found sound. As someone who takes phone photos and records the odd sound when out and about it shows where the idea can go give a deal of talent in photography & music.

Ian Rawes

Ian Rawes spoke about several sound map mashups. Starting with his own London Sound Survey which features London maps, ambient sound recordings, sound maps, local history & London wildlife. This is a site to get lost in, the quote on the front page Perhaps the most ambitious and comprehensive approach to sound mapping I’ve yet to see . . . an all-around wonderful site! (from Jim Cummings, Acoustic Ecology Institute) rather understates it! Ian is the Vault Keeper at the British Library sound archive (I think). Ian briefly showed us round the London Sound Survey playing recording of a street preacher (there are quite a few) and a Common Pipistrelle bat recorded with a Magenta heterodyne bat detector set to 45 kHz and Edirol R09-Hr digital recorder which gives you an idea of the range of the site if not the depth. He also showed us the London map with present-day streetmaps, historical maps and sound recordings.

Ian is also the person behind the UK Sound Map , I’ve blogged about this before and contributed a few boos to the map. what I love about the project is the fact that it is open to anybody to contribute, it is easy to do so and it mashes maps & sound.

We then saw the Acoustic map from 12 Gates to the City The acoustic map is an ever-growing collection of 1 to 5 minute sound recordings embedded on a world map at the exact location of each recording. created by Jonathan Prior, an Edinburgh-based creative researcher, who was sitting in the audience. Johnathan’s map is interesting because it uses UMapper rather than google maps, it looks and sounds good. We heard the underwater recording of periwinkles grazing on algae which sound nothing like you would expect. It looks as if there is a lot of interesting stuff on 12 Gates to the City.

The Inukjuak Sound Map is another map sound mashup this time created by Montreal sound artist Nimalan Yoganathan. The map has cultural and natural sounds, some with images. It uses google maps. We also watched Charles Veasey’s Hmsg Spiral Map which I had seen before, but it was interesting watching with other people on a large screen rather than in one’s own home with multiple on and offline distractions. The Hmsg project is a flash/video/google maps mashup.

One of the main impressions I got from the event was the quality of the audience’s listening, this made the evening quite quiet and contemplative, quite different from, say, a TeachMeet or educational tech event. I had not taken a laptop or ipad to take notes, but if I had I would not have used them, I didn’t take any photos either although I had a phone with me. In googling the links for this post I re read Inukjuak Sound Map and Hmsg Spiral Map on Ian’s London Sound Survey blog:

The Spiral Map looks and sounds very impressive as it progresses smoothly through its 30 different sound recordings and videos. Most of the videos have very little motion in them and much more action is heard than seen. It’s a great way to set a balance between the ravenous eye and the patient ear.

Educational Takeaway

I came away straight after the event, an empty stomach and dinner waiting kept me from the pub, with open ears, walking to the train station listening more than usual. At the station I was surprised that the announcement and the clicking and clacking of the high heeled shoes were louder than the train.

I’ve also been thinking of how this could relate to the classroom. Here are some ideas off the top of my head:

  • I’ve often used photos and sometimes video as stimulation for creative writing, following Tim Nunn we could add recordings as a great stimulus.
    Children recording sounds from a trip as well as taking photos and videos could be an powerful addition to stimulate writing and discussion back in the classroom. I’ve also had children record poetry with backing music, perhaps found sound could be used as well.
  • I’ve often involved pupils in creating movies from still pictures adding their voice with iMovie. It could be really interesting to add recordings Timothy Cooper style I think some children could be excited in working this way.
  • I’ve been building picture and gps map mashups for a while now, occasionally incorporating audio and recently mapped my boos this could easily be adapted for a school trip or for a collection of schools to work together. Or perhaps schools could contribute to UKSM itself. Playground sounds across an authority or skipping songs could be a starter.

Technical

In the afternoon workshop there had, I think, been a lot more technical information. Ian provides a Budget binaural stereo microphones guide on London Sound Survey. A lot of the Field Recording crowd seem to know what they are talking about kit wise, I was somewhat relieved when Ian appropriated the Best Camera quote: The best microphone is the one you have with you.

In talking about UMapper, Ian said it was in some ways easier to use than google maps. This is probably right, but I like the way google maps can be use to auto update, using the api, so that things are added without automatically, without crafting

More Takeway

Finally what I’d take away was the quality of listening shown by the audience & presenters. The time taken. Timothy Cooper’s Blast beach gave plenty of time to look at the images: audio can be slower. I am thinking again about Ian Rawes’ “the ravenous eye and the patient ear”, Tim Nunn’s theatre performances in the dark.

From the above you can see I’ve gathered a great number of links, sites not only to visit but to revisit. It is not often you get the chance to hear periwinkles eating.

A while back I posted about a system for Simplifying the glow logon I was developing. Hopefully some folk in North Lanarkshire will be using this next term.

Yesterday I was thinking about another way to improve the glow logon screen again along the lines suggested by Sean Farrell – logging into glow at TeachMeet SLF 2010

This is a very simple way to ‘improve’ the glow logon, works in Safari and Firefox and is ready now. It works by using a JavaScript bookmarklet which can be added to your browsers bookmark bar, clicking it on the glow logon page results in:

  1. The font size of the username & password fields is increased.
  2. If you hover the mouse over the password field it will show you what you have typed into the field.

Here is a wee video showing how to add the bookmarklet to a browser and using it on the logon screen.

If you would like the bookmarklet you can get it from http://glo.li/hecNqX.

Or just drag this link to your bookmarks: Big Log On

It should be easy enough to make this work in Internet explorer too.

At the moment the bookmarklet just loads this simple script.