Friday afternoon I saw this tweet: Twitter / tombarrett: “Three Interesting Ways to … from Tom Barrett and popped over to the google presentation on using your Pocket Video Camera in the Classroom. At that point there were three ways and a few folk in the chat. I got an invite from Tom and when I got home I added a slide, by that time there were four ideas so mine made five, I added another later in the evening. By this morning there are nineteen ideas in the slide deck and there have always been a few folk viewing the presentation when I’ve checked it. As I get ready to post this there are 21 ideas. There has also be a ton of tweets linking to the presentation.

Tom has a wonderful ability to get these things rolling through his extensive twitter network. The shared google presentation idea is a great idea, Tom has used it before: Thirty-Eight Interesting Ways (and tips) to use your Interactive Whiteboard and a couple on google earth, as has Doug Belshaw with Interesting Ways to use Netbooks in the Classroom.

What is about these efforts is the amount of collaboration that they attract, much more tha, for example my own efforts. I think part of the secret is probably the low bar to add to the resource. I guess it took me about 2 or 3 minutes to add the first of my slides and about 90 seconds for the second. This is a lot more reasonable than expecting folk to create a wiki page and fill it up. Google Slides are pretty straightforward, no need to read the docs, the technology is pretty transparent. The other part of the secret is, of course, Tom’s excellent use of twitter and the respect he has earned from educators around the world, I can’t wait for his next idea.

When I heard I was going to be working in north Lanarkshire one of the first things I did was to check ScotEduBlog’s list of blogs to see if there was much blogging activity going on, I found one: Our Lady’s High School.

in the few months I’ve been there I’ve heard of many more, but the other week I overheard my colleague Ian unblocking a blog, this turns out to be Mr Mallon’s Video and audio media part of Mr Mallon’s Physics Site which has a great url http://helpmyphysics.co.uk/. The site contains a pile of resources for physics and science including a podcast and video recordings by pupils. I has a listen to a podcast and pinged a mail to David Noble for the Podcast Directory his review says:

Very professional production from this North Lanarkshire teacher. Mr Mallon mixes a range of topics and approaches with humour and educational songs. Links to fun and helpful resources to enhance learning are provided.

I discovered a few more blogs this week when Robert Dalzell a North Lanarkshire QIO mailed me to ask if I’d have a word at the Modern Languages business meeting about blogs and blogging. He already has an example blog up and pointed me to euroblog from Coltness and Modern Languages @ Dalziel. I’ll be looking forward to getting into my comfort zone (not the mfl bit obviously) and talking about blogs.

If there are any other North Lanarkshire blogs out there please let me know.


Wu wei – No action
Originally uploaded by ????

I’ve been a fan of posterous since it started and have been amazed how the service has added features as quickly as they have been suggested. A couple of days ago the announced public group sites with post by moderation. This allow you to open up a blog to posts by anyone, but you get to moderate the posts.

I imagine you could use a group posterous for a inter school poetry blog (for example) between schools allowing children to concentrate on their writing and the evaluation of their partners.
Or a a zero setup class blog if your pupils have separate email addresses.

Posterous of course is blogging by email, with zero setup. Posterous takes just about any sort of media and deals with it in a sensible way. Posterous also sends you posts to other places (twitter, flickr, blogs etc) automatically if you want.

Garry Tan one of posterous’ cofounders had set up a public blog Posterous Recipes for Recipes and I though I’d give it a spin. All I needed to do was to drag a couple of photos from iPhoto onto the mail icon on my Mac’s dock, up popped a mail window with the photos attached, I put in the address post@recipes.posterous.com and clicked send, it was that simple. No resizing of photos, posterous presents them beautifully without out me having to think about them.

Posting my recipe, Posterous recognised my email and linked my recipe to my own posterous. And as I posted to post@ rather than posterous@ it picked up my settings and tweeted for me and posted the photos to flickr too!

Although the main way of accessing Posterous is via email, the web interface if beautiful for example, commenting in posterous is a very sweet, no opening the post in a new window, just an ajax reveal of the comment box: simple and clean without confusion.

The guys at posterous are incredibly responsive, I’ve mailed and tweeted them a few time and always had replies within hours, give the time difference this is really impressive. They are improving posterous almost all of the time; on one occasion in response to a blog post elsewhere, taking suggestions, acting on them and reporting all in the comments!

The fact posterous deals with blogging sorts of media without the user having to think. This echoes a Chinese philosophical phrase act without doing; ? ? ?; wei wu wei (wei wu wei: “action without action” or “effortless doing”).

This reminds me of When the technology gets boring, then things get interesting socially, a quote I saw in a comment on Ewan‘s blog, originally from Clay Shirky. Elsewhere (I think) Ewan talked about email as an example of this. With posterous you can use email, a tech you can use without thought, so that you can concentrate on what you are posting, the teach not the tech (Ewan again). Or for pupils the learning not the ict skills.

Last week I had some Glow training, I am starting to get quite excited about the possibilities of pupils using Glow. The potential is there, but the tech needs to become less obvious. Posting video to glow involves using a browser, then an ftp client, and then back to a browser. Coincidentally the previous night I was testing a flip video camera and popped the result onto posterous by simply dragging the file onto my mail app, filling in the to address and hitting send.

The Flip camera and posterous are both effortless technology, in education both could help by lowering the bar so that learners can concentrate on the learning and not get caught up in the tech. Glow has incredible ambition and potential I hope it becomes an effortless tool in the same way posterous and the flip camera are.

sunset from cochno hill

For the last couple of years I’ve had end of year blogs reviews (2006 and 2007 Roundup) and I guess it it that time again.

I’ve had a bit more change in my life than usual this year reflected in the change of blog url and title.

I don’t really think I’ve got my head round the direction of the blog yet but I hope it will develop over the next year.

I’ve blogged steadily, although at a reduced rate this year about a post a week. The main reason in this reduction is probably twitter which is providing sense of community, which is one of the reasons I blog, without the effort. I blogged about twitterish things a few times: News Reading, New Tweeting, ObliqueTweet, my first twitterbot, Edu Twits – a no code mashup (part 1) and Twitter, fun and facts and generally had fun with twitter.

I also blogged about and blogged with posterous. I’ve manages 64 posts there since June a much better posting rate than here. Posterous is an amazing blog service where you can blog via email, very simple to use with lots of interesting possibilities. At this time last year I was pointing to Tumblr but I think posterous is better for my purposes and posterous can forward posts to tumblr (and blogs and twitter and flickr and…). I’ve not used posterous in an educational setting, although I know Dai Barnes is using it with pupils successfully.

I’ve always enjoyed blogging about actual use of technology in my classroom as opposed to possible ideas but I did as usual post about technology that I’d played with tested rather than used with children including:

A minor note on my big change in September was the iPhone. It has transformed my tech life and I blogged about it: ScotEduBlogs on iPhone, took it for a walk and onto the onto the train. The phone has change my reading habits (more rss), blogging habits (more twitter and posterous), filled up my flickr account and increased my interest in gps, kml and mapping. I’ve not really used the phone facility much though;-)

I did a fair bit of blogging about my classroom including: A Jukebox and a Wiki, On the street where you live – An International Poetry Project and GPS MathTracks, the last was about my favourite lesson in 2008, combining several interests: teaching outside, gps and the iPhone. It was also one of the last lessons I taught at Sandaig.

After I left I posted a couple of times rounding up my ideas about Small Scale Video and Cameras in Class these, I think, are my most useful posts this year.

Sunrise

Next year, blogging about my classroom, which I’ve always though was my mainstay will disappear. I guess I’ll keep playing with the toys (my least commented on posts are the ones I like most; messing about with APIs and amateur mash ups, but lack of comment will not stop that;-) ), I’ll think about classroom practise without getting too idealistic or unrealistic (I hope) and probably post about Glow as it is introduced into North Lanarkshire. Have a good one!

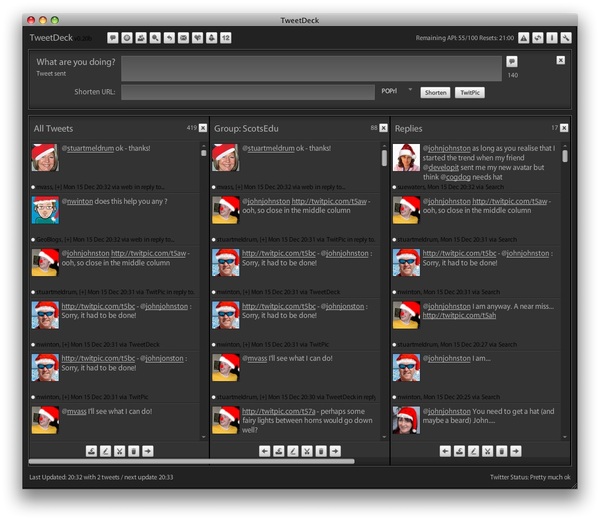
Like many folk who teach using ict and blog about using computers in teaching I take a lot of screenshots. Macs have great keyboard shorts cuts for this built into the system:
?-shift-3 put a screenshot of the whole screen on the desktop.
?-shift-4 gives you cross hairs to snap a selection.windowshadow

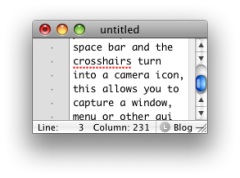
While in the selection mode you can press the space bar and the cross-hairs turn into a camera icon, this allows you to capture a window, menu or other gui element and adds a nice drop shadow to it automatically.

With both keyboard commands you can hold the control key down and the screenshot will go to the clipboard rather than the desktop. The latest version of the MAC OS uses png files as default.

This is very useful stuff and I usually just take the screenshot with the control key down and paste into ImageWell for annotating, cropping resizing and uploading, all of which ImageWell does very quickly and efficiently. ImageWell even put the html image tag onto the clipboard after uploading.

I know a lot of folk use skitch for this sort of thing, but I’ve always found ImageWell fits better with my style of working.

So I though I was pretty well fixed for taking screenshots, but I have now downloaded the demo of LittleSnapper, Screen and Web Snapping for Mac OS X to give it a try. LittleSnapper doesn’t do much more that the above mac screen capture as far as capturing from the desktop, but it then handles the pictures in some very useful ways. The application instals a system wide menu which lets you take a variety of screenshots but instead of the resulting pictures ending up on the clipboard the end up in LittleSnapper.

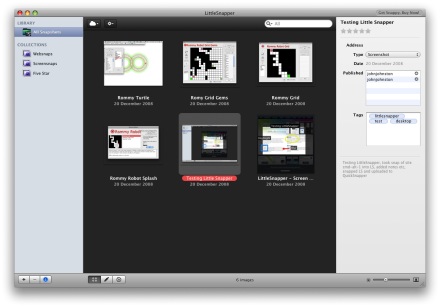
The LittleSnapper interface is quite familiar if you use iPhoto, itunes and the like. Very intuitive it allows you to tag, rate and describe the images. You can organise them into folders, collections (sets for folders) and with smart folders.

You can annotate the images, adding text, blurs (useful for usernames and personal details), highlights and various vertor graphics.

I said above that LittleSnapper doesn’t do much more than the system for desktop screenshots, but it does for screenshots of websites where things become even more interesting. You can just use the system menu to snap your current browser window into your LittleSnapper application. When you do so it not only snaps the page it brings in the source code and the url of the page. You can also (again from the system wide menu or a keyboard shortcut) pull the current page into LittleSnapper’s built in web-browser. you can then snap an element of the page, you click the element selection tool and the mouse then highlights elements on the current webpage as you rollover them, paragraphs, divs, and other html define sections of the page. click on an element and then a button to snap the element. The element is added to your library awaiting annotation.

The annotations, crops, highlights etc are applied in a non destructive way so that you can roll back to the original image if you want.

After you have done all of this you can then upload the images in several ways, via ftp, to flickr (example) or QuickSnapper, this last is a companion site to littleSnapper with lots of flickrish, web2.0 features (example). The ftp and quicksnapper export worked seamlessly here, but the flickr export uploaded the pic to flickr but then LittleSnapper sat with a progress bar for a few minutes, LittleSnapper unexpectedly quit on cancelling the progress bar. The image was on flickr but on the tags or description.

From the Case Studies on the LittleSnapper site would suggest that the audience for the application is made up of designers and developers. I think that they could add eduTech to that list. For writing walkthroughs, documenting, blogging and presenting LittleSnapper looks like a very handy tool. If the flickr upload works it would be easy to write and publish guides to using software without leaving the application by producing a set of screenshots with descriptions. (This could then be published to a website using the flickr API perhaps.)

It would also be interesting if the app was AppleScriptable as another option for automatically publishing. I guess it is early days for that.

The only obvious thing I can see missing is a way to resize images before publishing them which would be very handy for blogging. I think I’ll stick with ImageWell for at least part of the process, but keep testing LittleSnapper for its organisational features.

If you are a mac using educator I’d recommend giving LittleSnapper the once over.

@suewaters well that did it:-)

This evening I was having a wee search for World war 2 images for reuse. I hope to be working with a class next term using images as part of there topic work, mashing the images with iMovie. I had a look in the usual places (including http://www.flickr.com/commons/ mostly) but didn’t get what I wanted. Scran have some great phtos but I don’t think we could edit them. So I turned to twitter, with the usual gratifying results now tagged on delicious:

LCC bomb damage maps – a set on Flickr

WW2 Image Album

Flickr: east_lothian_museums’ stuff tagged with worldwartwo

World War II Posters – a set on Flickr

WW2 History – a set on Flickr

NEN Gallery : World War Two

Flickr: PhotosNormandie’s Photostream

ARCHIVES NORMANDIE 1939-45

I’ve also discovered that pivot allows you to display an rss feed in a post, so this list will update as I add more links to delicious.

@johnjonston : Sorry, it had to be done! on TwitPic

Thanks Neil

At the same time as I was doing lazy research, nearly everyone else i know on twitter seemed to be playing connect 4 with Santa avatars! @nwinton is busy making Santas out of everyone on TwitPic / nwinton. It is this sort of mix that make twitter special, useful and silly at the same time.

If you have any other sources of World War 2 photos that can be reused in class let me know with @johnjohnston on twitter or for:troutcolor on delicious.

I’ve been thinking of how I’ve used digital camera in class over the last few years. I know this is not a very ‘new’ topic for a post but I think my experience and thoughts are worth noting. I blogged about the use of cameras as part of activities countless times but I want to work out of a sort of practical overview here.

When I started blogging with my class at Sandaig, I was assuming that quite a lot of our visitors would be on dialup and kept photographs on the blog to a minimum. A year later we were adding photos but keeping the size down. At that stage I was often taking the photos and certainly helping loading them onto the computer. Another year on (2006) we had settled for 400 pixels as a good with from the blogs and all of the posts had at least one photo, the children were using MS photo editor to resize the photos.

By the time I left Sandaig I had the children taking photos every day for different purposes.

I know that this is still relatively unusual, in many classrooms it is the teacher, or PSA who takes photos or children use cameras under tight supervision. I think we need to relax that.

First you need a purpose for taking photos, I had a rota of class bloggers, even if they never finished their posts they usually took photos and transferred them to a pc.
We also had a photo a day section on the website How does our Garden go a simple image gallery, were a different pupil would take a photo in our garden each day, rain or shine, of anything they liked (within reason). This activity linked to our eco schools efforts, but its main purpose was to give the children practise in taking photos so that they should then use them in other areas without thinking about the practicalities.

By linking the activity to public display on the school website you immediately have an excuse to talk about appropriate images and responsibility. Children of course want to take ‘silly’ photos of their friends grinning and fooling around, discussing why we would not use these when reporting on a class activity cuts down on time wasting pretty quickly.

The only time it is worth a member of staff taking photos is when the children all want, or the teacher wants them, actively engaged. In these cases the photos can become part of a follow up activity.

Once you have your photos they can be used in many ways. These ares some I’ve used.

  • In a one computer classroom photos of events or activities can be printed as part of a template for children to write reports on. you can do this on the fly as groups of children finish a practical activity.
  • As a stimulus for writing, a slideshow of images, promotes discussion and can be run during the actual writing. If the writing is word-processed photos can be added.
  • For blogging, as part of a post, writing of any type, or as a slideshow made with various online tools (oneTrueMedia example).
  • For comic-life, a great way to motivate those children reluctant to write, for quick sequencing etc, etc. Examples: Eco Ninjas, 3D Shape.
  • To make ‘movies’ on movieMaker or iMovie (with one computer this can be a class activity, each child dealing with one picture, titling and adding transitions, the whole class discussing sound tracks.) individual examples, whole class example.
  • After an art lesson I often had a pupil take photos of all of the work for a web gallery (example), I think I’d now have each child take their own. These could be used for a portfolio, say in powerpoint with 2 stars and a wish, building up a record of all the art produced in a year. This ould be part of the clean up routine, clean brushes, take photo…
  • As a quick and dirty scanner, taking photos of drawn work to incorporate into a report, not necessarily the cleanest looking pictures, but effective: for example.

All of these are pretty simple ideas and the list could easily be extended. What, I think, makes the difference is the attempt to make use of the cameras an everyday activity, owned by the pupils, and familiar enough so that they use technology transparently. Using the images in blogs and wikis etc gives the task an audience and makes it real and purposeful.

Title: FrameByFrame and ScreenFlow

On Friday I took part in the North Lanarkshire ICT co-ordinator’s meetings and the Educational Computer Centre, when I say took part I mean my colleague Ann McCabe did all the heavy lifting, but I did talk to the groups about FrameByFrame a stop-motion animation application for Apple Macs. FrameByFrame is not as fully featured as some applications but it is very easy to use and freeware. There are some good example movies on the FrameByFrame webpage.

I’ve not used FrameByFrame in the classroom although I’ve had children make a few animations (Sandaig Example) with other software. Apart from the chance to make animations that relate to their learning making an animation involves a lot of creative team work and co-operative learning, obviously valuable in the classroom. FrameByFrame will give you a good chance to try out animation without expense, altohugh it lacks titling and the ability to add audio that could be done easily by importing the movies into iMovie.

I’ve made a few quick tests with FrameByFrame and though it might be interesting to use ScreenFlow to make a wee movie of using FrameByFrame. ScreenFlow is an application for creating screen recordings on a Mac. I blogged about ScreenFlow before, but I’ve not used it much since. It looks like the most powerful screen recorder available for a mac, it records the whole screen but then lets you edit the footage, zooming in to areas or windows and a whole lot more.

The following movie is much more of an experiment than a polished piece of work, I did not really read the ScreenFlow manual (there are a series of movies on the ScreenFlow site), so made one or two mistakes.

  • I didn’t really plan well enough and did not realise that ScreenFlow would not let you combine recordings, (you can add more recordings to a recording).I made 4 separate recordings and combined the exported movies in QuickTime Pro. Planning is obviously vital in producing good.
  • a script might help.
  • I shot the animation and recorded it in my kitchen which as you can see has very poor lighting.
  • I relied on the built-in mic on my macbook, an external mic may have sounded better.

After I exported the movie at the suggested 640 x 400 I then stiched them together in quicktime Pro and rexported a few times changing the size and quality of the movie. i then used QuicTime Pros export for web feature to export m4v files and the html need to display the movie. This export seems to do a great job of getting file size down, but again reading a maunal may improve that.

ScreenFlow looks like it will be very useful in helping teachers and pupils use software in the classroom, and I think I’ll spend some time watching the manuals and practising.

On sunday evenings I often take part in EdTechRoundUp. EdTechRoundUp is an informal group of educators, interested in talking about technology. originally planned as a planning meeting for a podcast the meet has evolved into a meeting that becomes a podcast. Planned on the edtechroundup wiki the meeting takes place in a Flash Meeting. Flashmeeting (described as the YouTube of videoconferencing) is a lovely free service for educators to hold online meetings with video, audio and chat elements.

The chats are a lot of fun and a good place to find out about many exciting uses of ICT in the classroom. Anyone cxan add to the agenda on the wiki and anyone can join in. The meetings are often chaired by Doug Belshaw who tidies up the audio for publication on EdTechRoundUp.com.

The audio is recorded not live but from a replay of the flashmeeting by volunteers. I have taken that role a couple of times and used WireTap, as I recall, wiretap pro could be used the same way as wiretap (an older free version) for free but I recently moved macs and downloaded wiretap studio. This worked fine for a couple of weeks and then I got to the end of the trial period. From the information on the WireTap Pro FAQs page I think I could download a version of pro and still use it that way but I’ve found another solution.

I missed the meeting on Sunday but got a tweet from Doug looking for someone to grab the audio. I said I’d do it and then found out that WireTap had timed out.

This is where Soundflower comes in.

Soundflower is a Mac OS X (10.2 and later) system extension that allows applications to pass audio to other applications. Soundflower is easy to use, it simply presents itself as an audio device, allowing any audio application to send and receive audio with no other support needed. Soundflower is free, open-source, and runs on Mac Intel and PPC computers.

Quick to download an install, soundflower gives you a couple more options in the Sound input and output preference pannel:

All I need to do was to set Soundflowe 2 channel as the default input and output, I then replayed the flashmeeting and used Audacity to capture the sound.
SoundFlower comes with an app Soundflowerbed (I’ve not tried it yet) and has a lot more features but this did the trick for me.

The other bit of software I used was The Levelator, once I had recorded the audio I exported it as a wav file and dropped that file onto the Levelator:

It’s software that runs on Windows, OS X (universal binary), or Linux (Ubuntu) that adjusts the audio levels within your podcast or other audio file for variations from one speaker to the next, for example. It’s not a compressor, normalizer or limiter although it contains all three.

The Levelator smoothes out the ups and downs of volume which you get form several folk talking in different places with different microphones to something that is surprisingly clear.

After that I just need to export the output from the Levelator to an mp3 and send it to Doug via dropbox. I had a listen to the audio on the way home from work yesterday and the audio sounds not too bad, the content sounds very good indeed, and I am sorry I was not there, well worth a listen once Doug sorts it out and put it on EdTechRoundUp.com.

I can also recommend joining in the flash meeting anytime you are free on a Sunday evening, a very welcoming space and I’d guarantee that you come away with a few interesting ideas or thoughts. Details are always on the front page of the wiki.