I was interested in this app when I read about it on micro.blog when the developer @becky posted about. I didn’t have a phone that took live photos at that point, so put it in my memory.

Today it popped back out and I installed it. I looks like it will be a useful app. It allows you to choose either live photos or videos and stitches then together. you can add title screens and audio, either from iTunes or some built in tracks1.

This solves the problem with how to share live photos. I have exported these as gifs from photos on a mac but the files are huge.

You can export 30 second watermarked videos for free and a £2.99 unlocks that limit 2.

I guess the app will mostly be used with live photos, to knock out a quick video and these will be short. It might be interesting to experiment with a little DIY ‘Ken Burns’ I an certainly thinking of holding the camera for longer when taking photos.

Anyway I really like the app,  the interface is great and it performs a useful task really nicely. I imagined  I’ll use it  to summarise a walk or a get my class to record a  school activity.

I think this could be an interesting classroom app, its simplicity and lack of features will, perhaps, be a better solution than the likes of clips or iMovie for a quick movie. Most of the iPads in my class are original Airs, too long in the tooth for live photos, but we have a few newer ones so I hope to give it a go.

Here is a quick video I made the morning while Christmas shopping.

  1. Most seem to be by Kevin Macleod a long time favourite of my classroom.
  2. I think 30 seconds is plenty for this sort of video, a few live photos, but I paid anyway. If we use it at school we will stick to the free version.

Microsoft acquires Flipgrid, makes it free for education.

I’ve not used Flipgrid, it might be a struggle with our bandwidth, but it looks interesting. A bit late for this term, but I might look at it next session.

Given you can sign on with an O365 account I wonder if this will be considered part of Glow? You can sign-on with a google account too.

Flipgrid is where your students go to share ideas and learn together. It’s where students amplify and feel amplified. It’s video the way students use video. Short. Authentic. And fun!

from: Flipgrid – Video for student engagement and formative assessment

Alan asked, Call / Plea / Beg for Responses: What If Creative Commons Certifications? for some feedback on Creative Commons. He is working on a project to educate folk about Creative Commons.

Here are the Questions:

  • Who are you? Introduce yourself, first name fine, where in the world you live, what kind of work you do.
  • What role does Creative Commons play in the things you do? This could be related to work/teaching, but also in terms of media sharing for content created. Or it could be “none”.
  • What would it mean to you to have a Creative Commons certification? What would you do with it, how would it play into the things you do. What is its value? And like in Bill’s video, that answer might be “nothing”.
  • What might it look like to earn a certification? Imagine, project a vision for what it would take for you to get a Creative Commons certification, how/where is it done (in person, workshop, course, online)? How long does it take? What kinds of things are you doing to earn it?

Alan suggested spending around 5 minutes recording. I spend a little more and my recording was shorter. I’ve taken a oblique shot at answering the questions, having a wee bit of fun. Here is my video:


On reflecting I should have spent a bit more time on this, but hopefully folk will get the idea. I like creative commons, publish using that license and consume a fair amount of cc material.

Some of the audio is a bit muffled, the video in the first section is poor, but I like the “poem” and the idea. The major faux-paux is the badges in the 3rd section, which is a public domain image, not one with a CC license.

Here is the text of the second section:

Creative Commons how do I love you, let me count the ways:

I love how you decorate my blog posts,
How you provide me with a grist for my mash ups,
You allow me to share and be shared,
Give me hope for a world that is less greedy.
You articulate freedom,
Win by losing,
Hint at the richness that the digital may provide,
You alliterate a connection to the best of the past, level the creative field,
And enrich the world.

Hopefully the hints at the levellers (not the band), and the commons on both of which my knowledge is slight and romantically tinged.

The Third and Forth Questions I try and combine:

These next two questions I though I’d tackle together.
I don’t have many certificates. I’ve passed the odd exam, got a degree but these have never really driven me to learn.
I’ve had a look at open badges and earned a few mostly tyre kicking.

What does drive me to some extent is approval from peers and betters. I like being involved in a community. I learn slowly in bursts and revisit things. I’ve learnt a bit about creative commons over the years, mostly by using and making and doing.

So rather than earn a certificate I might like to be loosely joined to a community with room for practise, play and learning. I would probably like a sticker or a t-shirt, I would not want a test.

My main though around creative commons is about sharing resources to be used creatively. I love to play with media and make things, Creative Commons is one of the things that really help. I don’t have any great claims for their worth, but I learn by doing. As a final aside I read this in the Observer today:

We’re creating more and more, this is the interesting thing, if you track the number of songs being written every year, there are millions and millions. We’re on a curve where basically everybody in the world will have written a book or a song or made a video, on average. Most of this is going to have a very small audience but that’s fine. Who cares? I think it’s OK that most of it is crap.

from: Digital prophet Kevin Kelly: I’ve learned a lot from Spielberg | Books | The Guardian

How nice if CC helps us move to a world where creating is not limited to the chosen few.

I’ve posted a few things here in reaction to the idea about banning mobiles in school: tagged: yesmobile.

Here is another reason for using mobile in learning:

I grabbed this video in the park this morning with my phone in the slowmo mode.

I would have though that the ability to do this outweighs the need to address problems of distraction?

On Saturday I went along to this event in University of Stracthclyde Innovation Centre. Orgainserd by Rob Smith and Bill Boyd in association with Scottish Film Education.

There were over 20 presentations and talks on a wide ranging set of topics.

The problem at events such as this is to decide which talks to go to and the regret on missing others. This can be exacerbated by watching the tweets from other sessions. I tried to guess which ones would be suitable for broadcasting and podcasting. This is tricky at a conference based around film.

During the day I broadcast from 8 sessions and David Gilmour (@dgilmour) kindly recorded more. This will be published on Edutalk over the next week or so. ScotFLF15 | EDUtalk, the links here should update as they are added1

Some of the recording start slightly late, due to my getting to the room late and a few will feature a samba band from the street as a background. What they lack in audio quality the make up for in content.

Although I’ve worked with creating video with and without pupils a fair bit I am not very knowledgable about film so I found interesting things in all of the sessions I attended. It would be hard to pick out a favourite. I certainly learnt a lot of new stuff from Rob Smith about Using Film in the Classroom and David Griffith talking about grammar in both text and film in From Shots to Sentences. I am more familiar with the work of Jennifer Jones on the Digital Commonwealth Project, but really enjoyed her talk and was delighted to get a hard copy of the ‎Handbook of Digital Storytelling as I’ve pointed folk to the pdf many times.
I suspect I missed a lot of details from the talks as I was recording I hope to gain from listening to and editing the recordings.

I do not know the official count of participants but it seemed pretty busy to me, as usual the number of Scottish teachers willing to go to cpd events in their own time is commendable. Some had travelled a fair distance and must of got up early. (Great to see Neil Winton). At a cost of £25 with plenty of coffee, pastries and a tasty lunch this was amazing value. There was a great buzz throughout the day. I’d recommend going along next year (I believe it will be run again).

Feature Image credit David Gilmour.

1. I am using the WordPress › RSS Via Shortcode for Page & Post WordPress Plugins to embed the RSS. That plugin is showing its age anf throughs some errors. so I’ve concverted the post to use the new (sic) block editor and am using the Display Remote Posts block.  

A few days ago @GlowScot pointed me to this tweet:

After a few exchanges I ended up with:

and now have time to type a few notes.

Video blogging is obviously a powerful tool for learning, used in Flipped classrooms, for showing learning of all sort and an engaging activity in its own right 1.

In the ‘old’ Glow Blogs using the old version of WordPress you could only upload files of <8MB you could use the Anarchy Media player to display video, uploaded or linked from elsewhere.

Our more up-to-date version of WordPress supports better video embedding without plugins and we set the maximum file upload size to 50mb.

Apart from file size video formats are a bit of a barrier to using video in blogs. It is better to use an external service such as YouTube or Vimeo. These services prepare the video for playback on a wider ranges of setups and also will hold much bigger video files. The disadvantage of these services is that they may be blocked on school networks.

When planning the upgrade to Glow Blogs we were advised by the technical team that the blog environment was not an appropriate place for hosting video. I pushed for 50MB file upload as a stopgap in case video file hosting in Glow did not develop in a way that could be used by the blog service.

Using YouTube & Vimeo video on Glow Blogs is a snip, both provides support oEmbed. This means that you just paste the url to a video page into the blog editor and the video will embed. The first time you see this happening is quite a pleasant surprise as the video is embedded in the editing field to.
Flickr video works in the same way but flickr video is limited to playing 3 minutes.

Here is an example of school blog using Vimeo: St Patrick’s Press Gang. A youtube example: Youtube test again | John Johnston. and Flickr Video

In the most recent release on Glow Blogs, August 2015 we added support for ClickView video too. ClickView does not support oEmbed, but or developer added the ability to take the url from a ClickView embed code and use that in the same way.

There is also the possibility of using Office O365 video from the glow tenancy. Currently O365 video is awaiting contractual clearance. Of course at the moment Office Video, like the rest of Glow O365, is behind a logon, so not practical for public display.

If you do want to host the files on Glow Blogs there are a few things to consider, the viewing of video files is a complex matrix of the video files and operating systems and browser ability to view them.
The best bet is probably to go for MPEG4 2. These files usually have the extension mp4 or m4v. Lots of video editors export to mp4. If you want to make your video file as small as possible you may want to add an application for compression int othe mix. currently I’ve found HandBrake a very useful tool.

HandBrake is a tool for converting video from nearly any format to a selection of modern, widely supported codecs.

Handbrake only works on the desktop. If shooting on a mobile, you will want to edit the file and export at a smaller size or use a app for shrinking video rather than uploading raw footage. Many mobile phones produce excellent quality video that results in large file sizes.

Personally I’ve found uploading to Glow Blogs works fine for example the Videos on Blogging Bootcamp vary in length between a couple of minutes and forty. These are screencasts which typically compress well.

Caveat, there are Video problem on iOS. The issue is now understood by the developers and we hope it will be fixed in the Glow Blogs environment very soon.

Summary

Upload to Glow Blog: limited to 50MB, currently doesn’t play on iOS
Youtube: May be blocked
Vimeo: My be blocked
ClickView: costs
Flickr Limited to 3 minutes
Glow Office O365 not yet available. May not be publicly sharable.

Personally my needs are met by keeping my videos under 50MB and uploading them to Glow Blogs. This will be improved when the iOS fix is in place.

  1. Next weekend I am heading to the Scottish Film and Learning Festival – Home to record and broadcast for Raido #EDUtalk. A quick look at Workshops – Scottish Film and Learning Festival indicated Film’s increacing importance.’
  2. A quick scan of the MPEG-4 Part 14 – Wikipedia page gives an idea of the complexity of video formats.

Back in March I had a wee shot of periscope. Since then I’ve sen a few notifications pop up on my screen, but not often had the chance to watch. Often they are fairly trivial, folk at the zoo or watching traffic or just testing the app.

Today I saw this tweet:

And hit the link. Turned out it was a presentation at ‎UPEI Multidisciplinary Graduate Research Conference from a Workshop by Dr. Bonnie Stewart 1 on Becoming a Networked Scholar. Dr. Bonnie Stewart on Becoming a Networked Scholar. I watch the first 45 minutes of the broadcast from a couple of different rooms at home. A very engaging presentation on social media in Higher Education, much in my opinion directly transferable to PL in primary and secondary education. For a short while you can see the video at: Bonnie Stewart on Periscope, but I don’t think that will be around for long. After I tweeted out the fact I was watching some one asked me about the quality:

In the age of mobile we take for granted tons of things, but we now have amazing power to communicate in our pockets. For her tweets it appears Bonnie joined periscope just before she started broadcasting. It certainly didn’t take any technical expertise on my part to watch.

As I tweeted, the audio and indeed the video was very clear and synchronised. The Screenshot is slightly blurrier than average. The projector screen was not to clear, but the whole thing was very watchable. NB. bonnie’s slides are up here: Becoming a Networked Scholar.

I was supposed to be going to the post office but delayed as long as possible, I am pretty sure that the stream would hold up on 3 or 4g but unfortunately the audio is cut off when the lock screen is on. That might be an improvement for periscope or my audio bias showing.

This has certainly given me the idea that you can broadcast with periscope with a deal of confidence and make a good fist of it without a lot of prep. I guess if you wanted someone could screen capture the video. Looks like it might be a useful TeachMeet tool, classroom use would have to be though about carefully, but it could certainly be used to bring video into a classroom simply. With more and more primary classes using twitter it doesn’t seem much of a jump to use a teacher’s phone to project onto a screen or, network allowing, to watch on a desktop.

1. Bonnie and her students were central to one of my favourite Raido #EDUtalk broadcasts, Radio #EDUtalk 06-03-2014: #ed473 ‘Considering networked communications for educators’ | EDUtalk

 periscope icon

 Periscope is a new video streaming service that hooks up through your Twitter account. It seems to have stolen a march over its rival Meerkat: Periscope v. Meerkat: Our Initial Re/action | Re/code

I gave periscope a quick test yesterday afternoon. In a break in the rain I headed to The Whangie for a quick walk. When I got to the Whangie itself I had I blob of 3G on my phone so without much hope I fired up periscope.

I was quite surprised that I seemed to connect and started walking and talking. I could not really see the screen due to lack of reading glasses and s rain speckled screen but I think a few people connected.
After nearly four minutes I finished. He app seemed to be trying to upload the video? Given the poor connectivity I was not surprised that it failed. The video was saved to my camera roll though.

Later reviewing the video I see that I made the mistake of assuming periscope would do landscape videos. The video look like a misty day in minecraft, I guess quality is decided by connection?


I’ve watched a few other streams and the quality has been a lot better than mine. It is quite strange watching random streams as folk try to figure out what is going on. I did see a broadcast of a ‘sporting’ event from quite nearby as swimmers in wetsuits tackled the Maryhill canal locks.

Educationally, what is this good for? Perhaps live links beamed back into classrooms from field trips or broadcasting egg incubators out to pupils at home after school.
The app is optimised for iOS 7.1 or later and iPhone 5 and up which I guess rules out my old iPhone 4 for experimenting with.
Why use it rather than other streaming apps, ease of use first and perhaps the low bandwidth requirements.

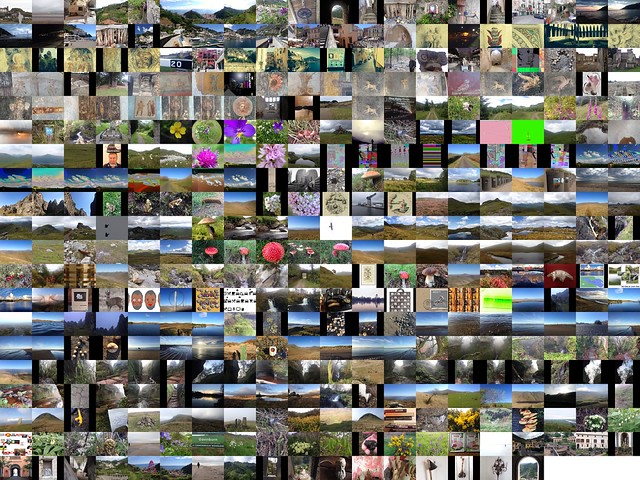
A few years back I used pummelvision to make a video of all of my flickr photos. Pummelvision was an online service where you pointed it to your flickr stream and it built a video for you and posted to vimeo. It could also take input from tumblr and facebook.

I though it might be interesting to make a similar video for my photos this year. However going to look for pummelvision drew a blank, the company had closed. I then though It might be interesting to try to create a similar video. From my memory and looking at my old video, pummelvision made a video with no transitions and very fast. As far as I remember it just used one tune. I downloaded my old video from vimeo and extracted the audio file using QuickTime pro. I took a guess that the frame rate was about 6 photos per second.

Grabbing the images

I guess there a few ways to grab all your photos from flickr, but this is how I did it. If I was doing it frequently I’d look into automating it, but this was a once off, or once a year if I do it again.

Flickr’s api would allow you to do this, but it seemed a bit excessive to try and write a pile of code. The Flickr API has a section to test all of the command so I headed to: Flickr Api Explorer – flickr.photos.search. There I put my own user ID in, set the min_date_taken and max_date_taken, increased the per_page to 500 and added the large photo url to the extras field.

This produced an xml file will all the information:

Flickr xml

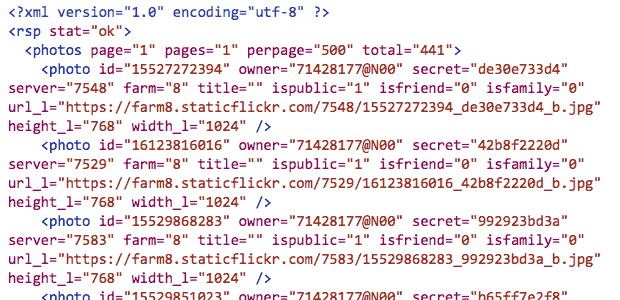
I then extracted the 397 urls from the text. There will be many ways to do this, but I am experimenting with the Sublime Text application at the moment, it found & selected all of the https: occurrences and the with cmd-shift-right arrow expanded the selection to the quotes. One copy got all of the files!

Once I had a list of urls I edit those so that each line was:

curl "https://farm4.staticflickr.com/3897/14598292323_ae6462fa07_b.jpg" > image_183.jpg

With the numbers out the image sequential and padded to 3 characters, eg image_001.jpg, image 002.jpg etc. I also numbered then in reverse so the oldest photo would be first.

I saved this text as a file, dl.sh and moved into the terminal:

cd path/to/thefolder
chmod +x dl.sh
./dl.sh

This code set the dl.sh file to executable and then ran it, the terminal filled with text and the folder with images. Curl is the command-line tool for downloading files.

Sizing images

Downloading the large size gave a folder full of images but some where landscape and some portrait, ie 1024 × 768 or 768 x1024 I need the images to all be the same size. So i used the sips utility to first resize them, sips --resampleHeight 768 *.jpg, then to pad the portrait ones: sips --padToHeightWidth 786 1024 *.jpg

Which gives me pictures like this for the portrait ones:

Img 076 toad

Making the movie

I discounted using iMove, moviemaker or the like as I wanted something quick (not necessary quick this time…) and that could be automated. I am also not sure in iMovie can show as fast as 6 per second. (Update, a quick look shows iMove can set speed to fractions of a second per frame.)

I though of a couple of ways to make the move, using Quicktime pro or ffmpeg. Quicktime pro proved the easiest option, opened the app and File -> Open Image sequence…, choose 6 frames per second, then all I had to do was save the movie.

Unfortunately Quicktime pro has been replace by Quicktime and it is a bit of a bother to get your old QT pro working if you had paid for a license. So I though I’d figure out ffmpeg too.

With great power comes great complexity

FFmpeg is A complete, cross-platform solution to record, convert and stream audio and video. It is a command line application and has a lot of variables. I can usually find out the right command with a bit of google. This one took quite a lot of google and failures. Most of these failures came from me trying to set a framerate, which lead to skipped frames. Eventually I dropped the idea of using the framerate options and got a very (too) fast video with this:

ffmpeg -f image2 -i IMG_%03d.jpg -c:v libx264 -pix_fmt yuv420p out.mp4

Note to self, in the -i, iput option IMG_%03d.jpg means all the images with 3 numerals, eg 001, 002… 375

I then slowed it down a little with this:

ffmpeg -i out.mp4 -filter:v "setpts=4.0*PTS" 2014-flickr-show.mp4

And added the audio:

ffmpeg -i 2014-flickr-show.mp4 -i pum.mp3 -map 0 -map 1 -codec copy -codec:a aac -strict experimental -b:a 192k -shortest 2014-flickr-show-audio.mp4

It took a fair bit of google to get the audio right too, the -codec:a option seems to sort things out.

Whys and Wherefores

As noted above, I could have done most of this with iMovie. But by using ffmpeg or QT pro, I’ve the opportunity to play, learn and possibly end up with an automated system. It would seem well within the realms of possibility to have a script that used the flickr api to download a bunch of images, perhaps for a year or with a tag and make a movie from them.

I’ve now figured out how to do most of this by piecing together the above fragments and finding out a bit about loops and renaming files, but I’ve no idea of how to create a bash script that will replace my hard coded tags, usernames ect with input, more to learn.

Once you have a lot of jpgs

You might as well do other things with them: Flickr 2014

I’ve just Joined Teach the Web:

Teach the Web: a Mozilla Open Online Collaboration for Webmaker mentors

May 2 – June 30

Learn how to teach digital literacies, master webmaking tools, develop your own educational resources, and take what you learned back to your communities and classrooms.

from: Teach the Web

The first task is:

MAKE Project this week: Introduce yourself @Webmaker style by using Popcorn Maker, Thimble or the XRay Goggles and sharing your make with #teachtheweb.

from: Teach the Web

Which smells quite like the #etmooc first task, so I decided to remix and recycle my Hello #ETMOOC youtube video with popcorn.

Popcorn Maker has evolved a lot since the last time I looked at it, Playing with Hackasaurus and popcorn, back then I gave up and used the Popcorn.js javascript files and edited by hand. At that time, I found popcorn maker really slow and klunky on my equipment. Since then it has really taken a jump (and I am on a better box). I found it really easy to use, and would say it would now be very usable in a classroom.

One of the things I am lookingfroward to finding out about is how folk fit webmaking into classrooms, as opposed to afterschool or out of school activities, but that is for later. Now I’ll jsut try and see what is going on in the #teachtheweb community.