

Update 29-09-2016: the pi is no longer posting gifs and images. I’ve recycled it it. Also hat-tip to Oliver Quinlan for catching a mistake in the instructions, I’ve fixed it below (sudo pip install pytumblr). The archive of over 50,000 gifs is still there.
A couple of weeks ago I blogged about getting my Raspberry Pi to create gifs and server them to the web:Gif Cam.
This only keeps the most recent gif. A couple of days ago I tried to set it up to catch the blood moon, and store a series of gifs but my scripts failed to work. It did lead me to changing the position of the camera from the local cross roads to the sky.
I then noticed a couple of interesting images, so though about how I could do that. There is not enough room on the pi’s SD card to hold images for very long. I started by uploading the gifs to a website via ftp. But this was still not a long term solution. I then though about Tumblr and after a bit of googling I’ve got a working solution that posts a gif of the Glasgow Skies to Sky Pi.
Here are some notes to show how I did some of it. You need to be able to use the termianl and a command line file editor such as nano. I am very much a newbie with this stuff.
My pi is on my home network connected to the router via Ethernet and a powerline. It is set up as a webserver with a domain, http://pi.johnj.info. I have ssh access to the pi and do any editing from my mac via ssh. None of these things apart from the connection to the Internet.
The pi is running from an SD card with NOOBS installed.
I’ve run: sudo apt-get update
and
sudo apt-get upgrade
before starting to get the pi up to date.
Code like the above is run form the terminal, either on the pi with a monitor and keyboard or by logging on via ssh. I create scripts on the pi in the terminal with nano, which is an uncomplicated text editor that is used in the terminal.
Taking Pictures, making Gifs
The whole thing runs from a shell script, which started like this:
    #!/usr/bin/env bash
    for (( i = 0; i < 10; i++ )); do
        raspistill -h 486 -w 648 -a 1036 -vf -hf --encoding gif  -o /var/www/tempgifs/cam${i}.gif
    done
    gifsicle --delay=10 --colors 256  --loop /var/www/tempgifs/cam*  > /var/www/tempgifs/camd.gif
    mv /var/www/tempgifs/camd.gif /var/www/camd.gif
    raspistill -h 486 -w 648 -a 1036 -ae +25+25 -vf -hf -o /var/www/camd.jpg
When the script runs, it takes 10 still pictures with the raspistill program. I am not too sure if these are the best settings, but
- -h 486 and -w 648 set the dimensions.
- -a 1036 stamps the date and time.
- -vf -hf flips the image and turns it upside down (to put it the right way up)
- –encoding gif outputs as a gif
- -o /var/www/tempgifs/cam${i}.gif set the file path for the export.
I saved this file to regulargif.sh and then made it run-able with chmod +x regulargif.sh.
I’ve installed gifsicle with sudo apt-get install gifsicle and use that to create the gif file. The last line creates a jpg too. You can see the current gif and jpg on Gif Cam.
I need the script to run regularly so I set up a cron job. To do this in the terminal type crontab -w and add
*/9 * * * * /path/to/regulargif.sh
to the bottom of the file. This will run the script every 9 minutes.
Tumbling Gifs
The next problem is to upload to tumblr. Tumblr has a well developed API and libraries for several languages. After a fair bit of googling for a simple solution I decided to just use one of Tumblr’s own. I though it sensible to use Python as that language seems to have a lot of support on the pi. I don’t know any python.
First you need to install the pytumblr python module. So in the terminal:
sudo pip install pytumblr
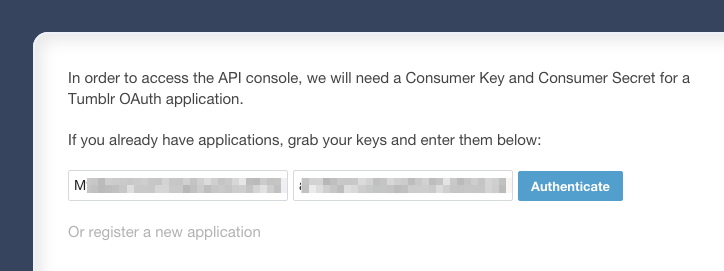
You also need to have various keys for the API: consumer_key, consumer_secret, oauth_token and oauth_secret. To get these you need to create an App on tumblr. Here is what I did. (Well this was a second run through to document, the first time got a bit messy;-))
register an application Click the button and fill in the fields.
This will give you the consumer_key and consumer_secret.

If you click the Explore API you will get a dialog to allow your new app to post for you (This did not work for me in Safari, I had to switch to Chrome and go through a couple of times).
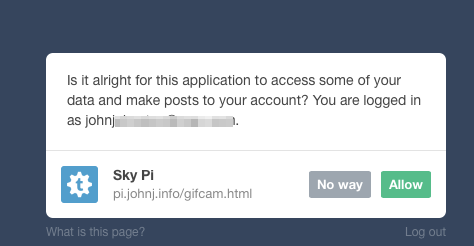
This will lead to a place to fill in your key and secret. Then the console.
The Console will let you test various bits of code but more important will let you copy a block of code with the consumer_key, consumer_secret, oauth_token and oauth_secret.
It is worth clicking on Example output on the console to make sure everything is working.
Moving back onto the pi and the terminal I edited a new file with:
nano pytumble.py
And edit the file:
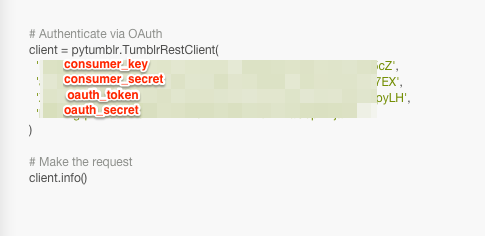
import pytumblr

client = pytumblr.TumblrRestClient(
 'consumer_key',
  'consumer_secret',
  'oauth_token',
  'oauth_secret'
)

# Make the request
o=client.create_photo('raspskypi', state="published", data=["/var/www/camd.gif"] )

print o
With the keys, tokens and secrets filled in. raspskypi is the name of the tumblr blog.
Save the file and make it executable. (chmod +x ) pytumble.py.
then type:
python ./pytumble.py
After a minute, if all is set up right you should see an id for the post returned and checking the blog should show a post with the image from /var/www/camd.gif
If all is well you can add:
python /home/pi/pytumble.py
To the bottom of the script that makes the gif.
Now every time the script creates a new gif, it should post the image to your tumblr blog.
Currently my pi has uploaded over 200 gifs: Sky Pi: Archive.
Trying to add upload to tumble to my photo booth
I am using python script but just can’t seem to get it to run right
Any advise