A #DS106 DailyCreate Twitter Bot

dailycreate-botThe DailyCreate Bot

I’ve always liked random and automated random things. While these are not strictly part of storytelling I’ve managed to bring them into DS106 whenever I can.

A while back I set up @DailyCreateBot for some reason or other. Obviously a Twitter bot of some kind to do with the Daily Create. I do remember having trouble with the OAuth requirements of the more recent Twitter API and giving up.

Last weekend, on a rainy day I blew the dust of my raspberry pi and got it online and set up as a server. I was not too sure what to do with it at the time.

During the week I did revisit a project to use the pi to flash some lights depending on a Twitter search. I don’t have hardware for that but I was interested in how simple the project was. There seems to be plenty of libraries that can sort out Authentication to Twitter for you now. A bit of googling and thinking, mostly googling and I have a Twitter bot set up.

The @DailyCreateBot will reply with a suggestion of a photo challenge of you mention him on Twitter. I am using the same list that Alan Levin provided for me for the photoblitz.

The @DailyCreateBot runs on Python. This is where the pi comes in I would not even know where to begin to find out how to host a python app but the pi lets me do that easily.

I am not proposing to write a step-by-step guide here but it is worth mentioning that several things went wrong or did not work as expected. All were beyond my 2 weeks worth of Python on the mechanical mooc . All were solved by a wee bit of googling and sometime just repeating things till they worked. The delight of working on a pi is that I knew I’d I totally messed up I could just reformat the SD card, install an so again and be back to square two.

I had already:

  • installed one of the basic OS FOR THE PI
  • Set up SSH access so that I can get ‘on’ to the pi from the terminal application on a mac and via SSH apps on iOS.
  • set up the pi as a web server and sorted out the DNS

Next:

*I found a python library and example code that replied.
*I added logic to reply with a random string taken from a list of challenges.
*Tested it a bit.

Then I posted to the DS106 Google + group and a few kind folk tested it a bit. Rochelle asked:

That is cool +John Johnston . It worked for me right out of the bot box. Do we upload to Twitter, tag them DailyCreateBot? I’d like to see what others have done. 🙂

Which got me thinking. A quick google found a php/JavaScript solution to showing tweets with the hashtag #dailycreatebot and I’ve got this up and running.

All very much a work in progress. There are few things to be ironed out:

  • the Python bot falls over every now and again complaining about UTF8 I need to google that some more.
  • the web page showing images just uses the styles used in the demo of the code. I need to tidy it up and perhaps skip tweets with the hashtag but no images.
  • there is also the problem Rochelle pointed out that if you reply to the bot you get another prompt. I wonder if I could turn off replies if there is an image in the tweet?

Anyway if your expectations are low you can join in:

  1. Tweet @DailyCreateBot and get a prompt.
  2. Tweet your photo with the hashtag #DailyCreateBot
  3. See what other folk are doing.
  4. Let me know of any interesting problems.

#DS106 Flickr Daily Creates Pummelvision style

I’ve been playing around with downloading groups of flickr photos and making very quick videos from them. Just blogged some of the process over on my main blog. Being a wee obsessive about this sort of stuff, I’ve created a script that will download all my photos with a particular tag, say dailycreate, and string them together into a movie.

You need to have the commandline ffmpeg application installed and have created a flickr app so that you have an api key. You need to know your flickr id too.

This works for me, copy the code below, replace the bold bits and paste into the terminal. Probably best to run this in a folder. Depending on how many photos you have it cold take a while.
FILELIST=$(curl 'https://api.flickr.com/services/rest/?method=flickr.photos.search&api_key=YOUR-FLICKER-APIKEY&user_id=YOUR-FLICKr_USERNAME&tags=THE-TAG&extras=url_l&per_page=200&format=rest' | sed -ne 's/.*\(http[^"]*\).*/\1/p');echo $FILELIST;for i in $FILELIST ; do curl -O $i ; done;a=1;for i in *.jpg; do
new=$(printf "%04d.jpg" "$a") #04 pad to length of 4
mv -- "$i" "$new"
let a=a+1
done;sips --resampleHeight 768 *.jpg;sips --padToHeightWidth 786 1024 *.jpg;ffmpeg -f image2 -i %04d.jpg -c:v libx264 -pix_fmt yuv420p firstmov.mp4;ffmpeg -i firstmov.mp4 -filter:v "setpts=4.0*PTS" flickr-dailycreate.mp4

This wee bit:

ffmpeg -i flickr-dailycreate.mp4 -i backgroundloop.mp3 -map 0 -map 1 -codec copy -codec:a aac -strict experimental -b:a 192k -shortest flickr-dailycreate-audio.mp4

would add some audio if there is a backgroundloop.mp3 in the same folder.

and all the pieces matter

and-all-the-pieces-matter
Gif using gifboard

This is a quick intro to installing videogrep.py a tool for making supercut movies. Written in haste, consider it a rough draft.

Videogrep is a python program run from the command line. This is quite different from using applications with a GUI. I am hoping to write up a few different tools I use for playing DS106 and will try and come back and expand on this.

More about Videogrep: Automatic Supercuts with Python – Sam Lavigne.

Code: antiboredom/videogrep · GitHub.

Caveats

  • I am no expert in using the command line. I’ve failed on quite a few attempts at installing.
  • As with a lot of software you can make mistakes, bad things can happen. You will be giving the software author control over your computer.
  • I am using Mac OS X
  • There is not a lot of detail here, I’ll come back and improve if it seems useful.
  • It is probably sensible to read all of the linked pages here rather than just go on trust.

Dependencies

Videogrep depends on a few python modules and programs. These are installed with pip (A tool for installing and managing Python packages) which you may need to install.

You also need to install FFMPEG (FFmpeg is a free software project that produces libraries and programs for handling multimedia data. ). One way to install FFmpg is with homebrew, which you need to install first!

Homebrew and ffmpeg

Homebrew, is a package manager it is installed and used via the commandline so you will need to open the terminal app.

You run stuff in the terminal by typing (or pasting) after the prompt my prompt is johnj:~ john$ if I am in my home directory which is called johnj

On the Homebrew site you can copy a line of text which if pasted into the terminal will install homebrew when you press return. I’d go to the site and copy from there rather than from here.

ruby -e "$(curl -fsSL https://raw.github.com/Homebrew/homebrew/go/install)"

The script explains what it will do and then pauses before it does it.

Once the script has finished it will recommend running:

brew doctor

To check all is ok, so type that and hit return, wait a while and the prompt returns. you can now install FFmpeg. The videogrep notes suggest you do with this:

brew install ffmpeg --with-libvpx --with-libvorbis

So try that, type it in at the prompt in the terminal, lots of text should stream by, by the time it stops FFmpeg should be installed. You can check by typing

ffmpeg -h

Which will display the help.

pip

Next you want to install pip, which lets you install other stuff. Again at the prompt type:

easy_install pip

Some text will go by and the prompt should come back.

Videogrep

Finally

Down load the zip file from antiboredom/videogrep · GitHub unzip and put it somewhere handy, your desktop folder for example.

The folder is called ‘videogrep-master’ I’ve just left it as that.

Inside the folder is a txt file requirements.txt this lists the python modules that you need to install, you don’t need to open it. Back in the terminal, cd into the videogrep folder:

cd path/to/folder

to do that type cd at the prompt and drag the folder into the terminal window, I see:

johnj john$ cd /Users/john/Desktop/videogrep-master

hit return and type:

pip install -r requirements.txt

and return again a ton of text will scroll past as past.

At the end, unless you have errors you are ready to go.

First cut

You need a video file and an srt file to match, there names must be the same except for the extension, eg:

  • The Wire Season 1 Episode 06 – The Wire.avi
  • The Wire Season 1 Episode 06 – The Wire.srt

If you followed the above steps your prompt should show you are in the videogrep-master folder:

johnj:videogrep-master john$

type:

python videogrep.py --input path/to/srt file  --search pieces --output pieces.mp4

more text scrolls past the terminal. A video pieces.mp4 appears in the folder, it is the supercut video.


Problems along the way

I had a couple, first in installing the requirments.txt I kept getting errors about pattern. To solve this I went to pattern, downloaded pattern and installed it. I then removed that line from requirments.txt and saved it before running pip install -r requirements.txt again.

The second problem I had was the movies created had no sound. I didn’t fix that, I just used miro video converter to convert the files to apple or iphone ones which did the trick. I am guessing this could have been fixed with ffmpeg too as miro video converter is, as far as I know, a gui for ffmpeg.

Where in the world is ds106?

Chatting to Alan Levine yesterday we had a wee idea about putting ds106 participants on the map. I suggested that it might be an idea to use Audioboo. The RSS feeds from audioboo have location data that can be used in google map mashups. I know I already had the code to put my own Boos on a map. I had forgotten that I’ve also got a page that will map boos with any tag. For example this page will show all boos tagged ds106

http://johnjohnston.info/where/ds106

I’ve recorded a boo that will show up on the map.


I’d like other ds106 participants to do the same. There are several ways to do this.

How to

You can record a boo using the iPhone or android application. Make sure you tag it #ds106 in the description and that the phone picks up the location:

fr_1474_size640
You can go to audioboo and record (needs flash) or upload an audio file there. Again make sure you tag with #ds106

You will need a free account to record boos that are limited to 3 minutes.

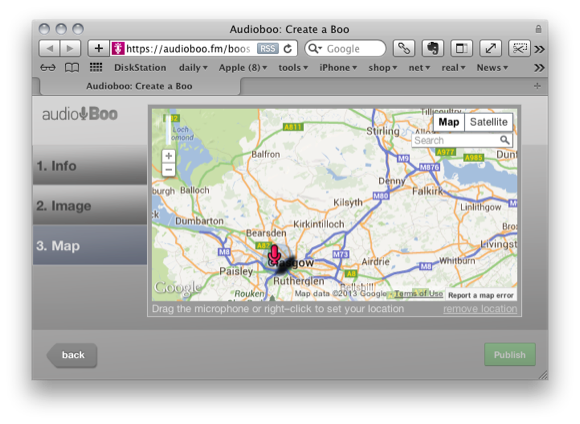
The ios app adds location data, I’d presume the android one would too. If you use the browser you can set the location.

audioboo-loc-580

I am wondering if this can be a mashup assignment, so easy it would only be one star.

Flicking a Five Card Story


Five Card Story: leaving

a Five Card Flickr story created by johnjohnston


flickr photo by dwtno


flickr photo by Serenae


flickr photo by bionicteaching


flickr photo by katerha


flickr photo by shareski


Thro the fence,

A mossy climb,

Deeper.

Leaving the city:

Into a cleaner space.


This week it is suggested that we try a Five Card Flickr story, I took a run at it yesterday.

As I clicked trough the activity, I kept getting ideas that would turn away as I loaded another set of cards, instead of going with the flow I restarted a few times. Better perhaps to just pick up the cards as they are dealt? I didn’t end up with much of a story.

Today I though I’d post it and my mind turned to styling the code provided a little, it then wandered onto maybe making a slideshow, the result is above.
I started off by adding a wee bit of css to add a frame/border round the photo.
You need to use the text/html editor in WordPress (similar in other systems too) to paste in the code from Five Card Flickr, I edited a bit in a text editor first as this is easier than using the blog editor.

First I wrapped the paragraphs containing the images in a div, putting:
<div id=”5cards”>
Before the first p tag and:
</div> after the last.

I then added a style block:
<style type=”text/css” media=”screen”>
#fivecards{height:320px;width:500px;} #fivecards p{text-align:center;; }
#fivecards img{max-width:500px;max-height:300px;border:solid 1px;padding:10px;box-shadow: 5px 5px 2px #888888;margin:5px} #fivecards a{color:#000}
</style>
This gave the images a border and a shadow.

U
I then needed some JavaScript to sort out the slideshow.

First I need to hide all but one of the images:
div4search=document.getElementById('5cards');
var someas = div4search.getElementsByTagName('p');
for (var i=1; i < someas.length; i++) {
someas[i].style.display ="none";
};

Next I need a timer to hide the current image and show the next one.

I found a nice timer class: Object Oriented Programming with JavaScript : Timer Class – Daily Coding which looked as if it would do the trick.
So added the code for the class to the post inside the script tag.
I then added a timer_tick function which will be fired every time the timer ticked:

function timer_tick(){
	document.getElementById("div1").innerHTML =index;
	var someas = div4search.getElementsByTagName('p');
	for (var i=0; i < someas.length; i++) {
		if (someas[i].offsetWidth>0){
			someas[i].style.display ="none";
			if (i==someas.length-1){j=0;}else{j=i+1;}
			someas[j].style.display ="block"
			break;
		};
 	};
}

This is not very elegant, instead of remembering which photo is showing I just run through them all and the one that is visible is the current one. If it is the last I show the first, else I show the next.
I added this to the script block.
The other thing I did was to take the javascript and run it through Minify Javascript Online this put it all one one line. I think you need to do this in wordpress or the editor messes up by adding p tags in the middle of the script.

Not a particularly good way to approach this in a general way, but a nice wee problem for pushing my babysteps javascript a bit. I often wonder if there show be a wee bit of htlm/css/javascript in ds106 and I frequently use messing about in this way to avoid the main question;-)