screenshot of pi.johnj.info/gb

One of the things I am interested in as part of my work on Glow Blogs is what people are using Glow Blogs for.

Glow Blogs is made of of 33 different WordPress multi-sites. One for each Local Authority in Scotland and one central one.

The home page of each LA lists the last few posts. Visiting these pages will give you an idea of what is going on. In the past I’ve opened up each L.A. in a tab in my browser and gone through them. I had a script that would open them all up. I’ve now worked out an easy way to give a quick overview.

Recently I noticed shot-scraper ,Tools for taking automated screenshots of websites . I’ve used various automatic webpage screenshot pages in the past. These have usually been services that either charge money or have shut down. I used webkit2png a wee bit, but ran into now forgotten problems, perhaps around https?

shot-scraper can be automated and extended. It is a command line tool and using these is always an interesting struggle. I usually just follow any instructions blindly, searching any problems as I go. In this case it didn’t take tool long.

Once installed shot-scraper is pretty easy to use. shot-scraper https://johnjohnston.info Dumps an image johnjohnston-info.png

There are a lot of options, you can output jpegs rather than pngs. Run some javascript before taking a screenshot or wait for a while. you can even choose a section of the page to grab.

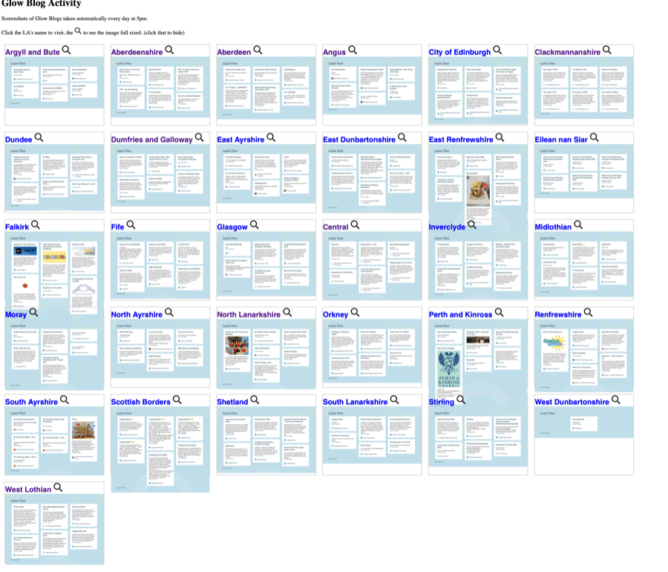
So I can use shot-scraper to create screenshots of each LA homepage. Then display them on a web page for a quick overview of Glow Blogs.


    #!/bin/bash

    cd /Users/john/Documents/scripts/glowscrape/img

    URLLIST="ab as ac an ce cl dd dg ea ed el er es fa fi gc glowblogs hi in mc my na nl or pk re sa sb sh sl st wd wl"
    for i in $URLLIST ;
    do
        /usr/local/bin/shot-scraper -s "#glow-latest-posts" -j "jQuery('.pea_cook_wrapper').hide()" --quality 80 https://blogs.glowscotland.org.uk/"$i" -o  "$i".jpg && continue
    done;
    

This first hides the cookie banner displayed by blogs and then screenshots the #glow-latest-posts section of the page only.

The script continues by copying the image over to my raspberry pi where they are shown on a web page

I hit a couple of problems along the way. The first was that the script stopped running when it could not find the #glow-latest-posts section. This happens on a couple of LAs who have no public blogs. adding && continue to the screenshot fixed that.

The second problem came when I wanted to run the script regularly. OSX schedules tasks with launchd. I’ve used Lingon X to schedule a few of these. Since I recently updated my system I first needed to get a new version of Lingon X. I then found that increased security gave me a few hoops to jump through to get the script to run.

I think it would have been simpler to do the whole job on a raspberry pi. But I was not sure if it would run shot-scraper. I’ll leave that for another day and a newer pi.

This is a pretty trivial use of a very powerful tool. I’ve now got a webpage that gives me a quick overview of what is going on in Glow Blogs and took another baby step in bash.

The first thing that surprised me was the lack of featured Images on the blog posts. These not only make the LA home pages took nicer they also make display blog posts on twitter more attractive.

https://raspskypi.tumblr.com/post/184806077919

The 100,000 gif on Ski Pi was published yesterday. These are gifs create by one of my PIs which are automatically uploaded to tumblr every 15 minutes.

I think it might be time to repurpose that pi or switch to video or something else. The process was more fascinating that the result. I need a better view perhaps.

I’ve been beta testing micro.blog. There is a new page here for status type posts, these get sent to micro.blog/johnjohnston and to twitter.

This has renewed my interest in finding different ways to post to the blog especially for short posts that would have previously gone straight to twitter.

Continue reading

I quite enjoy scripts and things that make my computing life a we bit easier. I’ve blogged a few times about AppleScript which I find very handy on my mac. On my iPhone I’ve never really found a way of automating things that stuck with me. I’ve downloaded and played with a few apps, but mostly they have felt a bit too convoluted for me.

I do regularly combine application to get a result, the so called app smashing, although I prefer the less destructive sounding playflow (I think I am the only person who does).

Workflow Icon

I’ve now found an application which looks like making this sort of thing on iOS a bit simpler: Workflow.

Workflow is more like Automator than AppleScript as it uses the same sort of block steps. You can combine any of the actions to create workflows. These steps or rather actions can deal with images, text, maps in all sorts of ways.

The think that makes this application stand out is that it has arrived hot on the heels of the iOS 8 improvements to inter application communication. You can set the application to the a Action Extension, this means it can be run from the share sheet in other applications. As you can set the input for a workflow to accept different things you can control the sheets where it will show.

In the screenshot below I’ve selected 2 photos and then hit the share button. When I click the Run Workflow button I can choose a workflow from the next screen(shown on the right) . In this case one choice is a simple workflow I made to downsize image an save it to the camera roll.

Sharesheet

These workflows are made by dragging and dropping action blocks onto a workflow. Workflows can be set to be run from a icon added to your home screen, the Launch Center app or from share sheets in other apps. The latter can be set to accept different types of data and will then show up in the appropriate apps.

So far I’ve only made a few very simple workflows with two or three block, but there is potential to loop and have if-then type decision making.

Some Workflows

There are over 150 actions you can use to build a workflow:

Actions

I’ve only scratched the surface of workflow over the last week or so, but it looks like it could make iOS more fun and effective.

A few links:

Lame Encoding

Part of the setup for Radio EDUtalk consists of AutoDJ where various rotations of mp3s are automatically played on the Live shows and stream EDUtalk page. We have now got about 4GB of audio from the broadcasts and podcast. These files are uploaded to the Radio server. As we pay for storage I cycle through a few sets from time to time.
When we set this up initially it involved converting all of the mp3 files to 64kbps and mono. I posted a description of the workflow I used to do this here: Summer pt 1: Radio EDUtalk.

Since then I’ve been gathering all the audio added by simply subscribing to the Edutalk podcast in iTunes. Today I thought I’d sort out the most recent files (104 episodes had build up) and add them into the mix. The last time out I used id3tool to add tags to the audio. Unfortunately this uses a old version of id3 tags which means some of the titles are truncated. I decided to look for a new workflow.
I found ID3 Editor which has mac, windows and linux versions, costs £10 and comes with a commandline utility.

This means I can use LAME to make 64kbps mono versions of the files and then just copy the tags across from the original files. I think, in theory, I could extract the original tags with exiftool and pass them to LAME to write them to the new file, but that seems far to hard for me to work out.

So in the terminal I move into the Edutak directory and convert all files to 64 mono in new folder with:

mkdir save && for f in *.mp3; do lame -m m -b 64 --resample 44.1 "$f" ./save/"${f%.mp3}.mp3"; done

This takes a wee while, and then this copies the id3 tags:

for f in *.mp3; do /Volumes/ID3 Editor/Extras/id3edcmd -import "$f" ./save/"${f%.mp3}.mp3"; done

I have a folder full of files to upload to the server (which looks like taking a few hours).